Understanding Kubernetes ConfigMaps and Secrets with Meshery
Introduction
In this tutorial, we will work with Kubernetes ConfigMaps and Secrets. ConfigMaps are used to manage configuration data, while Secrets are used for sensitive information such as passwords. Using Meshery Playground, an interactive live cluster environment, we’ll perform hands-on exercises to gain practical knowledge into working with these Kubernetes objects.
NOTE: If this your fist time working with Meshery Playground start with the Kubernetes Pods with Meshery.
Prerequisites
- Basic understanding of containerization and Kubernetes concepts.
- Access to the Meshery Playground. If you don’t have an account, sign up at Meshery Playground.
Lab Scenario
- Start with an existing design of a simple MySQL pod.
- Add a ConfigMap to set the database name to be created on MySQL pod deployment.
- Use a Secert to set the MySQL root password.
Objective
Learn how to create and manage Kubernetes ConfigMaps and Secrets within the context of a microservices architecture.
Steps
Access Meshery Playground
- Log in to the Meshery Playground using your credentials. On successful login, you should be at the dashboard. Press the X on the Where do you want to start? popup to close it (if required).
- Click Kanvas in the navigation menu to navigate to Kanvas.
NOTE: Kanvas is still in beta.
Clone the starter design
For this tutorial we will start with an existing design and later add ConfigMap and Secret components to it. The design is a simple MySQL pod.
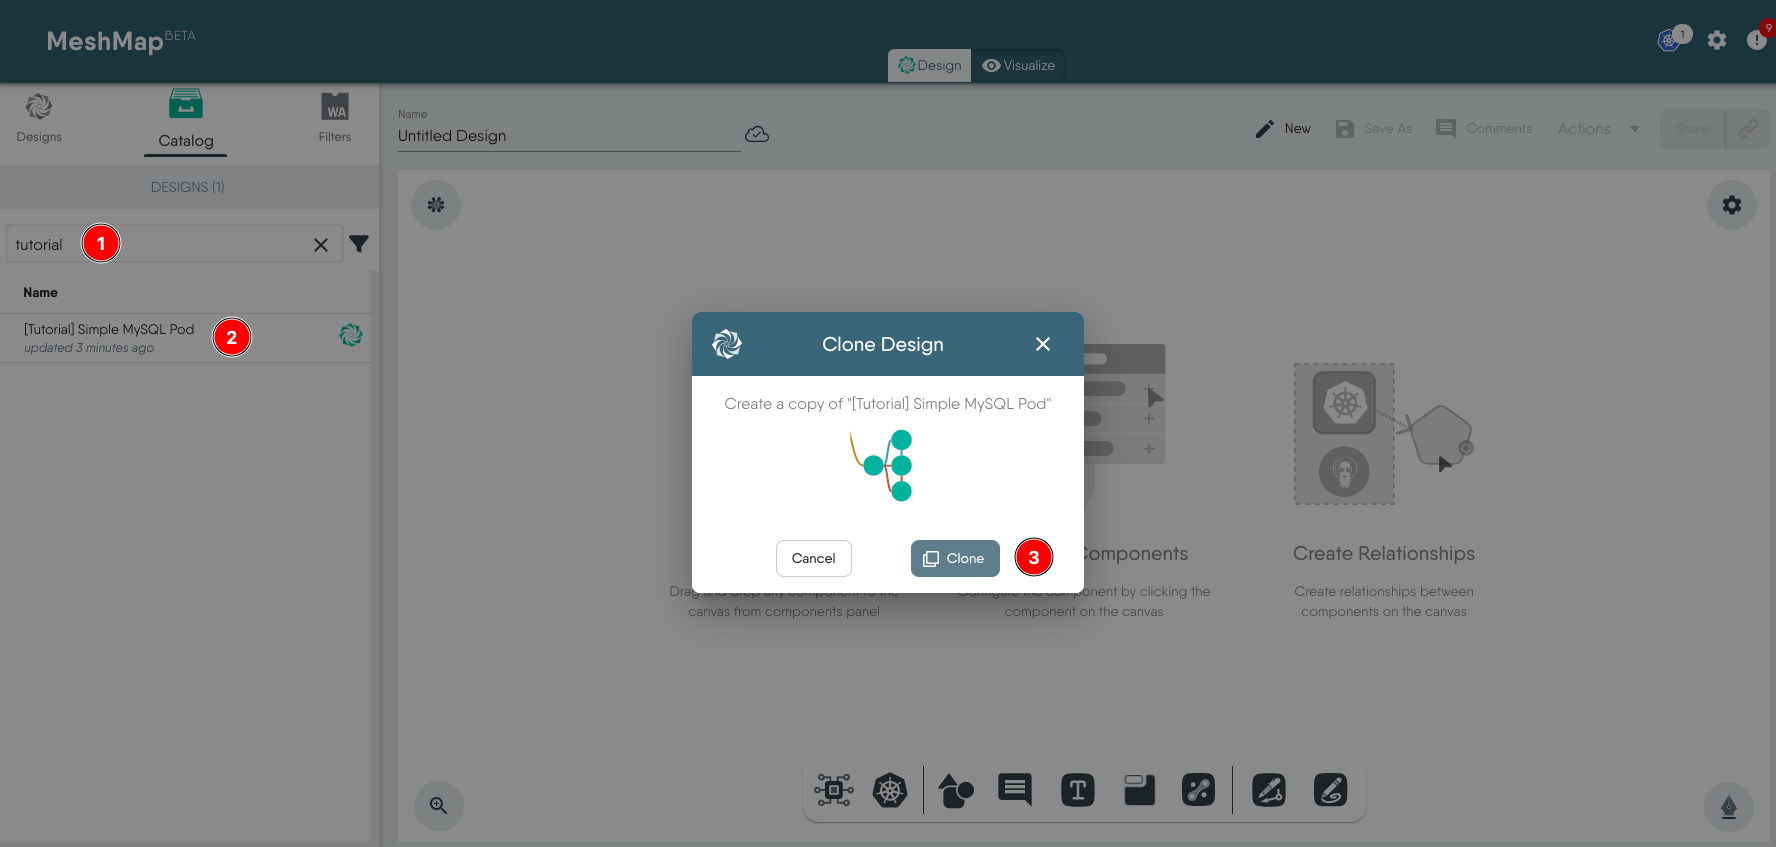
Select the Catalog tab and search for the word ‘tutorial’ (1). Click on the [Tutorial] Simple MySQL Pod (2) design and when prompted click Clone (3).
Label the pod with a unique key-value pair for easier filtering later. For example, user:johndoe. Use the same key-value pair fot labelling all the other resources. The tutorial uses environment:tutorial, do not use the same.
Create and configure a ConfigMap
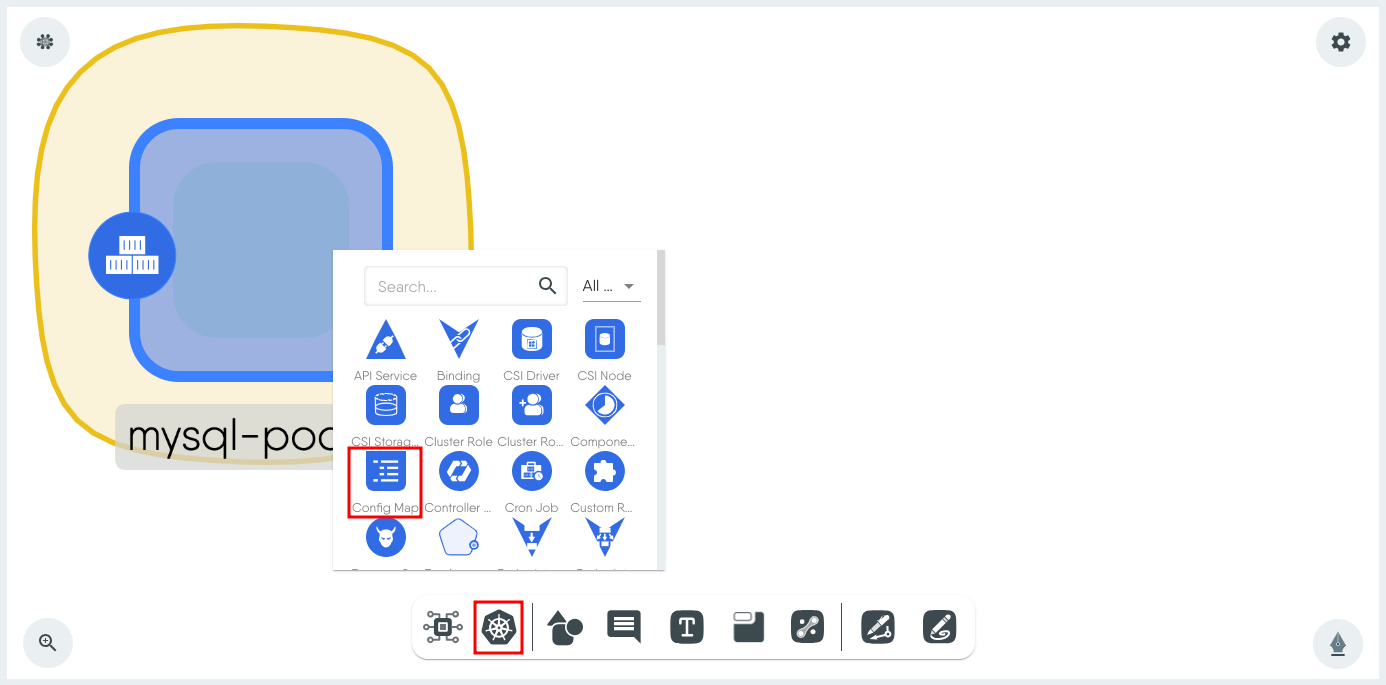
Click Kubernetes from the dock and select Config Map from the list. This will put the ConfigMap component on the canvas.
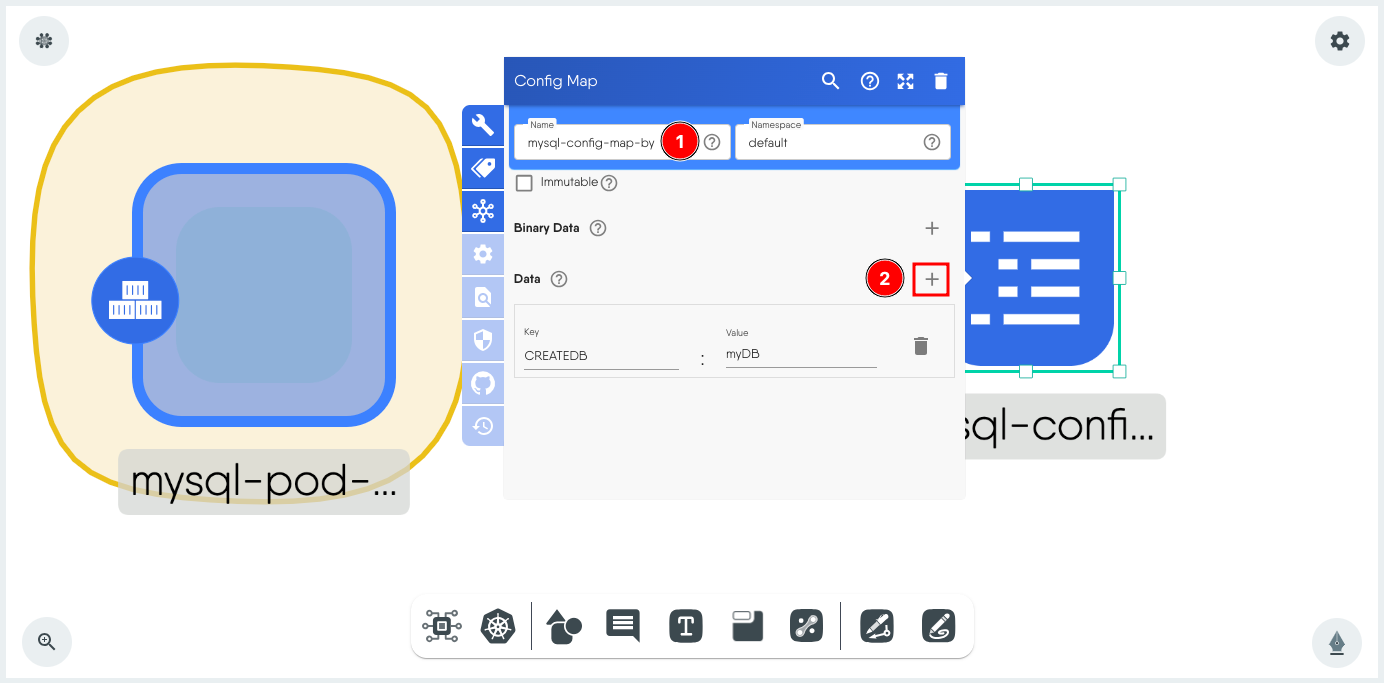
Click the ConfigMap component to load the configuration window.
- Change the Name if required. (Using a unique name helps with easier identification later)
-
Click + next to Data and set the ConfigMap data as a key value pair. In this example, the Key is CREATEDB and the Value is myDB.
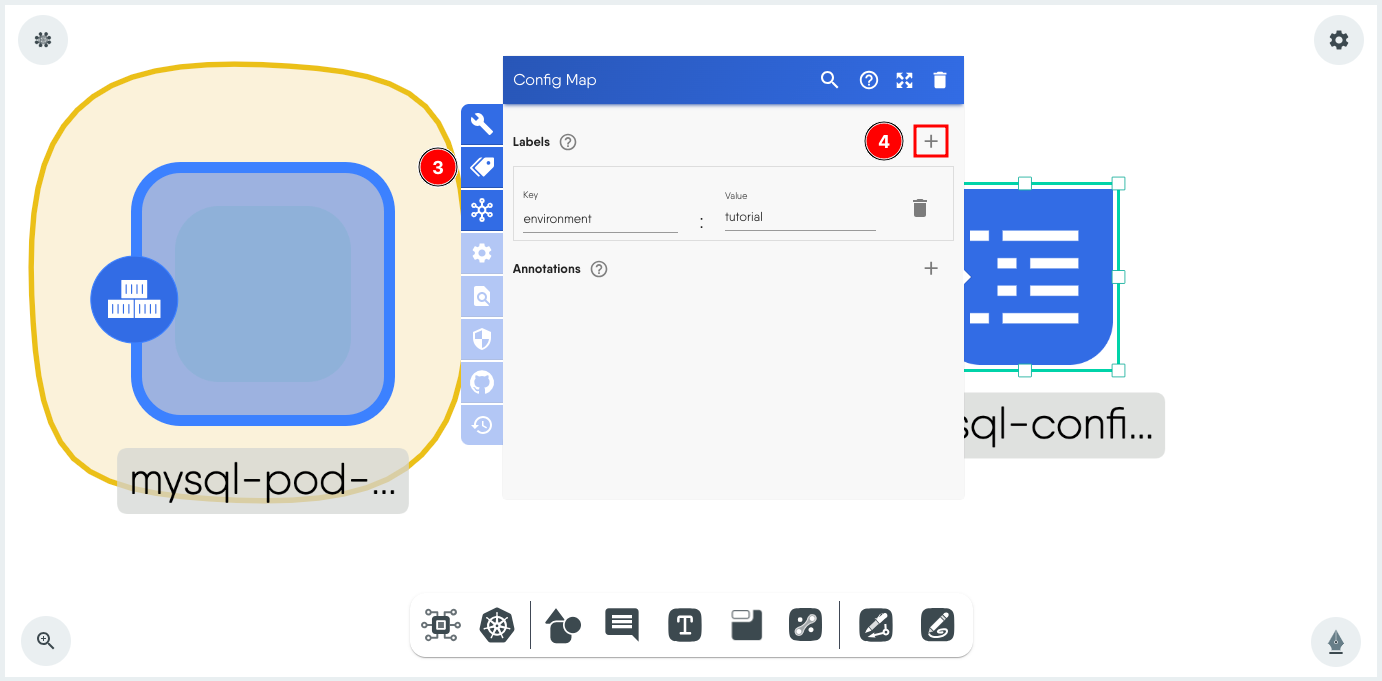
- Click on the label.
-
Set a label for easier filtering later during Visualization.
- Click outside the window to close it.
Make a note of the ConfigMap component name and key for use later.
Create and configure a Secret
Before you proceed, choose a password and convert it into base64 format. Use an online tool to do so. For this example the password is strongpassword and the base64 of it is c3Ryb25ncGFzc3dvcmQ=
Click Kubernetes from the dock and select Secret from the list. This will put the Secret component on the canvas.
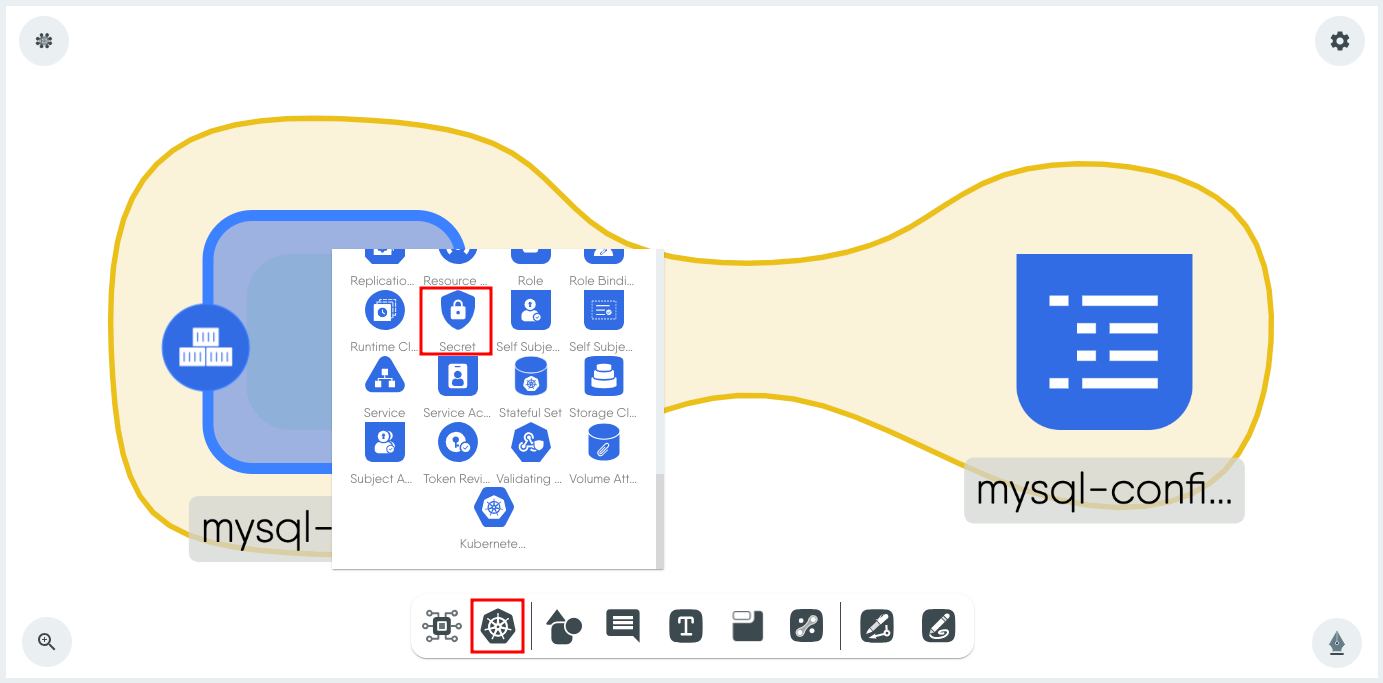
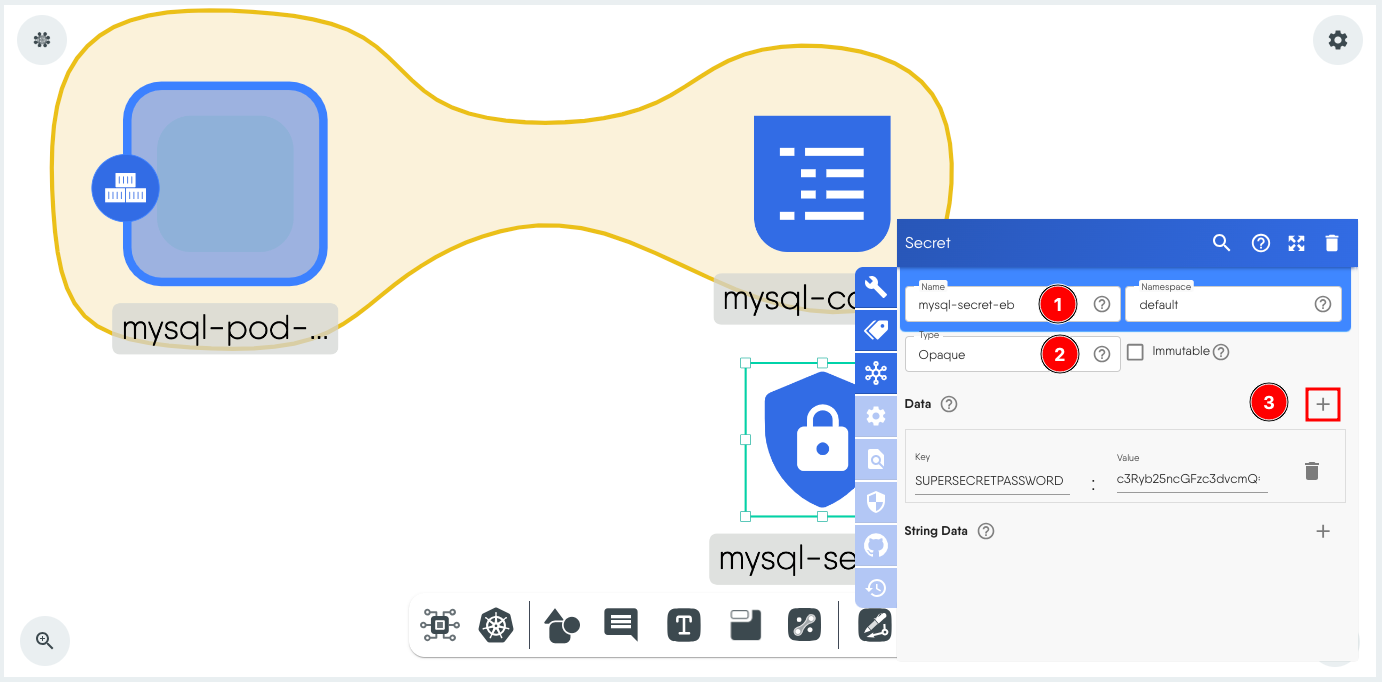
Click on the Secret component to load the configuration window.
- Set a name.
- Set Type as Opaque.
-
Click + next to Data and add the secret as a key value pair. For this tutorial, the Key is SUPERSECRETPASSWORD and the Value is c3Ryb25ncGFzc3dvcmQ=.
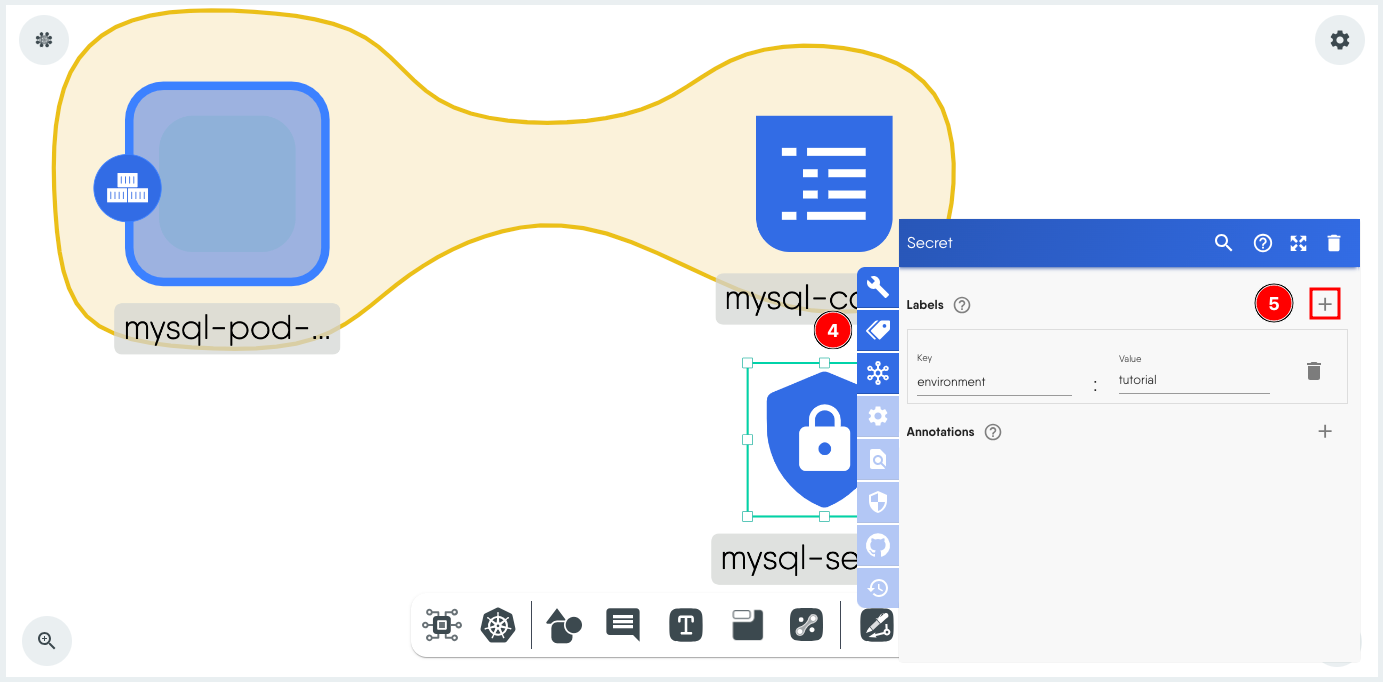
- Click Labels.
- Set the same label as used earlier in the ConfigMap.
-
Click outside the window to close it.
Configure the Pod to use the ConfigMap and Secret
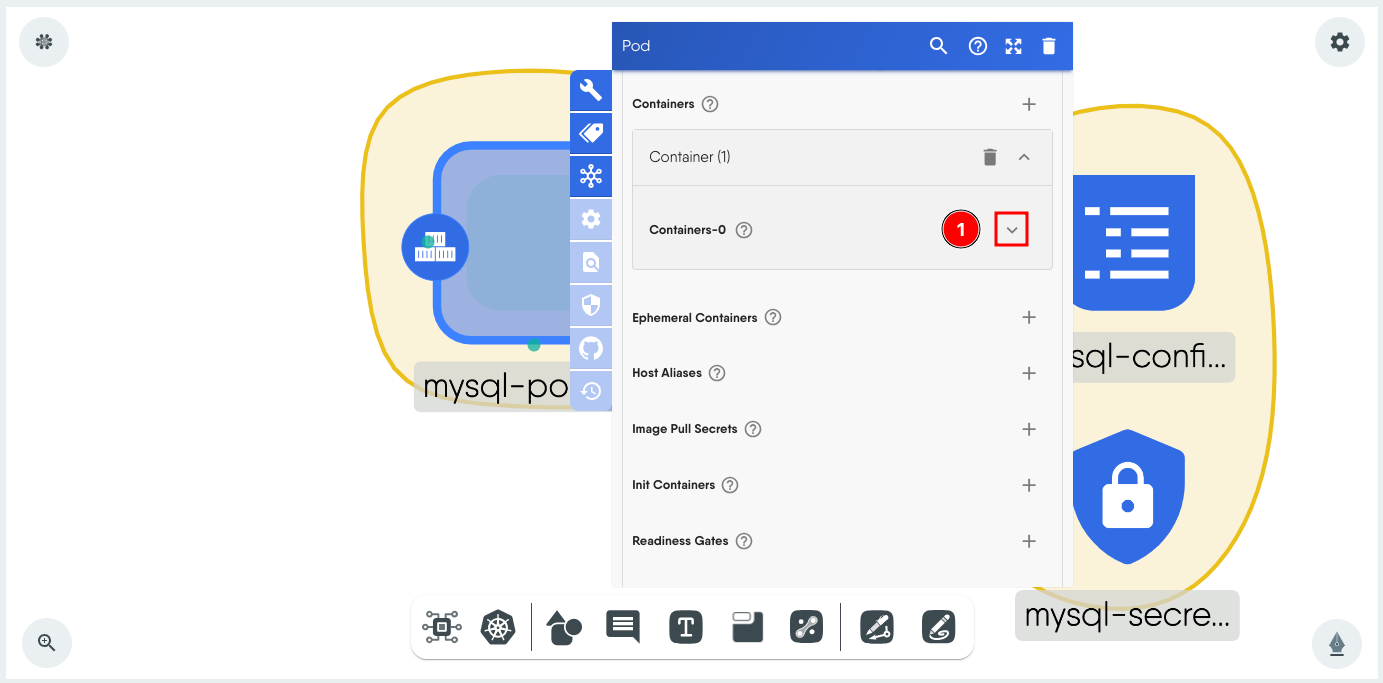
Click on the Pod component to load its configuration window. We will set the Secret first and then the ConfigMap.
-
Scroll down to Container and expand Containers-0.
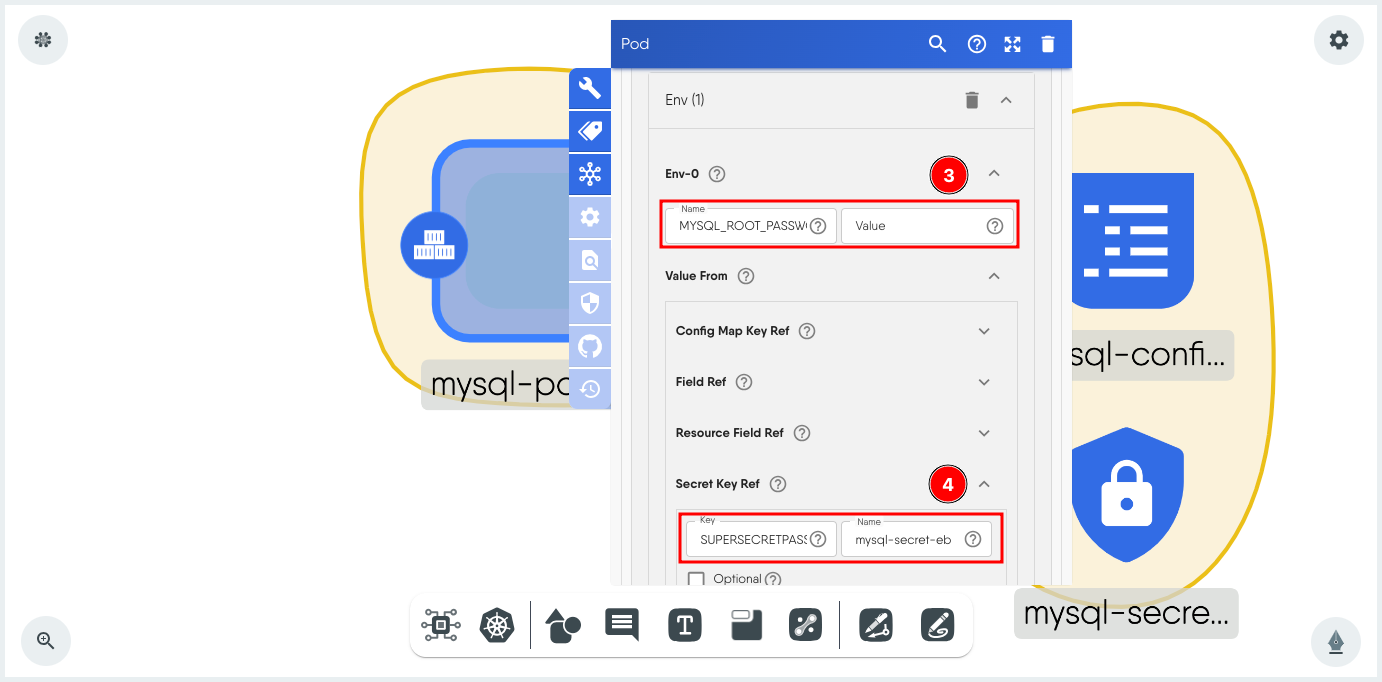
- Scroll down to Env. An existing environment variable for the MySQL root password is already set. We will modify this to retrieve the password from the Secret.
- Expand Env-0 and delete the contents of Value.
-
Expand Value From, expand Secret Key Ref and set the Key to the name of the key in the Secret and the Name to the name of the Secret which in this example is SUPERSECRETPASSWORD and mysql-secret-eb.
-
Next, click + next to Env to add a second environment variable.
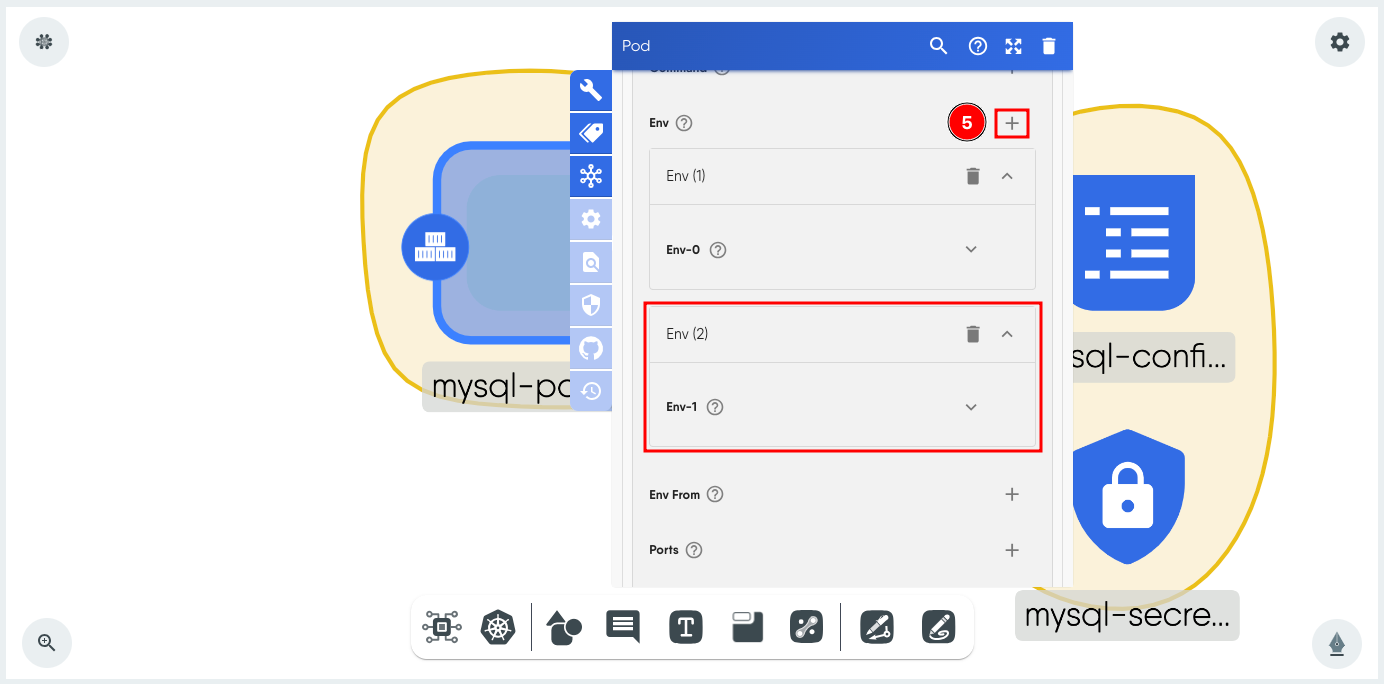
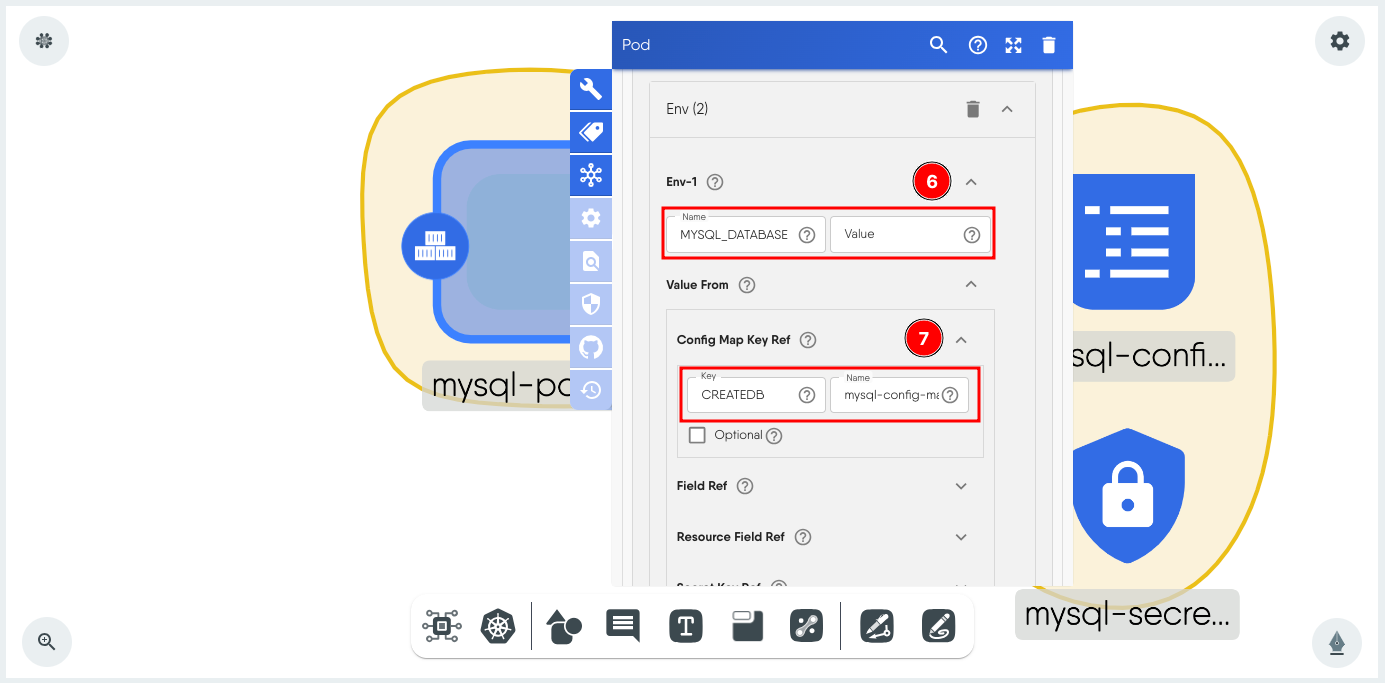
- Expand Env-1 and set Name to MYSQL_DATABASE.
-
Expand Value From, expand Secret Key Ref and set the Key to the name of the key in the ConfigMap and the Name to the name of the ConfigMap which in this example is CREATEDB and mysql-config-map-by.
Validate and Deploy the Design
Click Actions and then Select Validate to ensure there are no errors. Then, select the Deploy tab on the same window and click Deploy.
Verify the Secret and the ConfigMap
Move to the Visualize tab.
Filter to show the resources pod, configmap and secret and use the lables set earlier to display only your resources. In this example, that is environment:tutorials.

Select the Pod (1) and then choose Actions (2) to the right. Click Open Interactive Terminal (3) to open the terminal to the container.
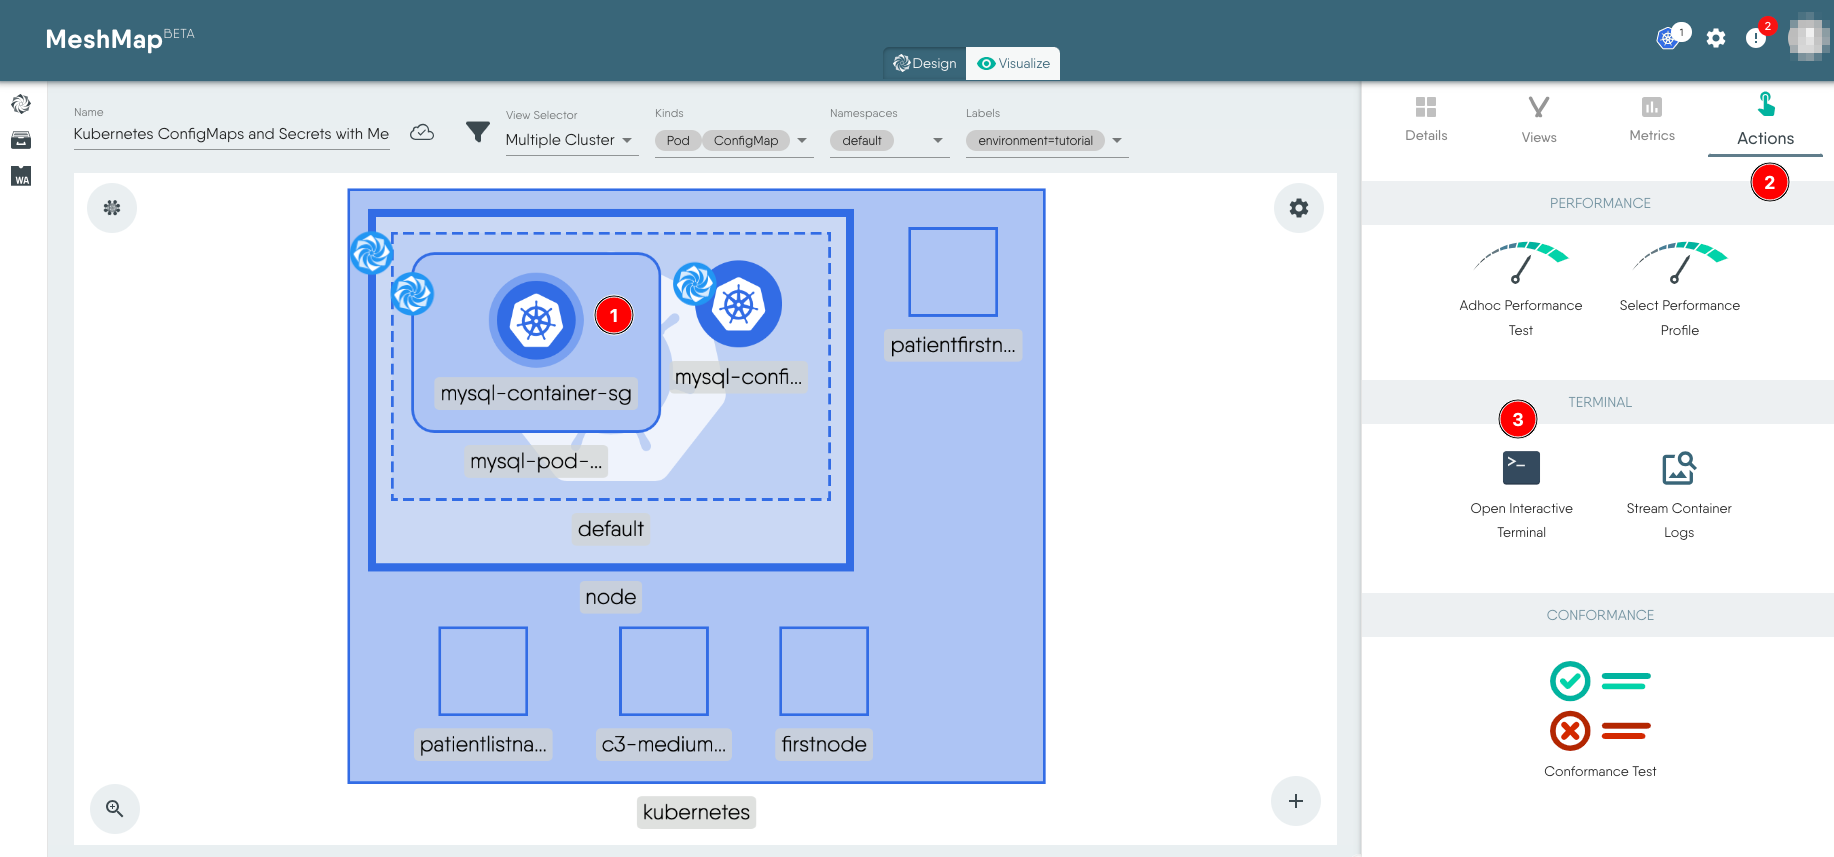
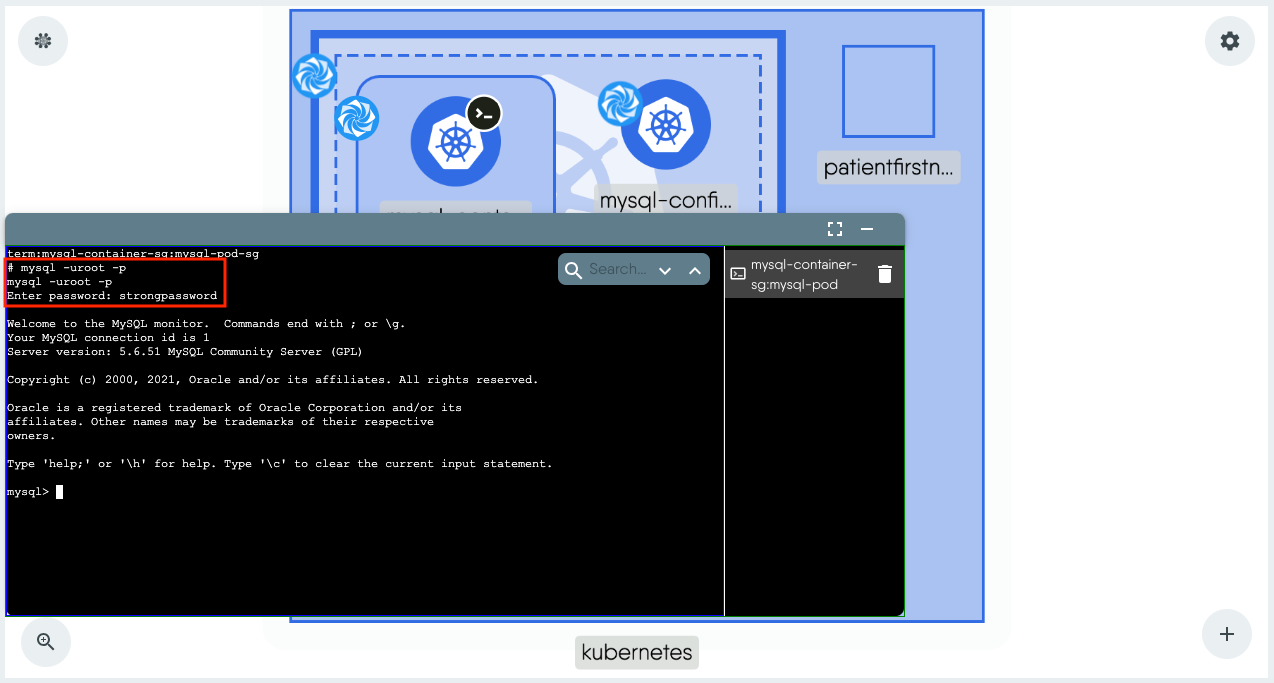
Run the following command in the terminal to verify that you are able to use the MySQL root password set as secret to login to MySQL. When prompted enter the root password (in plain text), i.e. strongpassword for this tutorial.
mysql -uroot -p
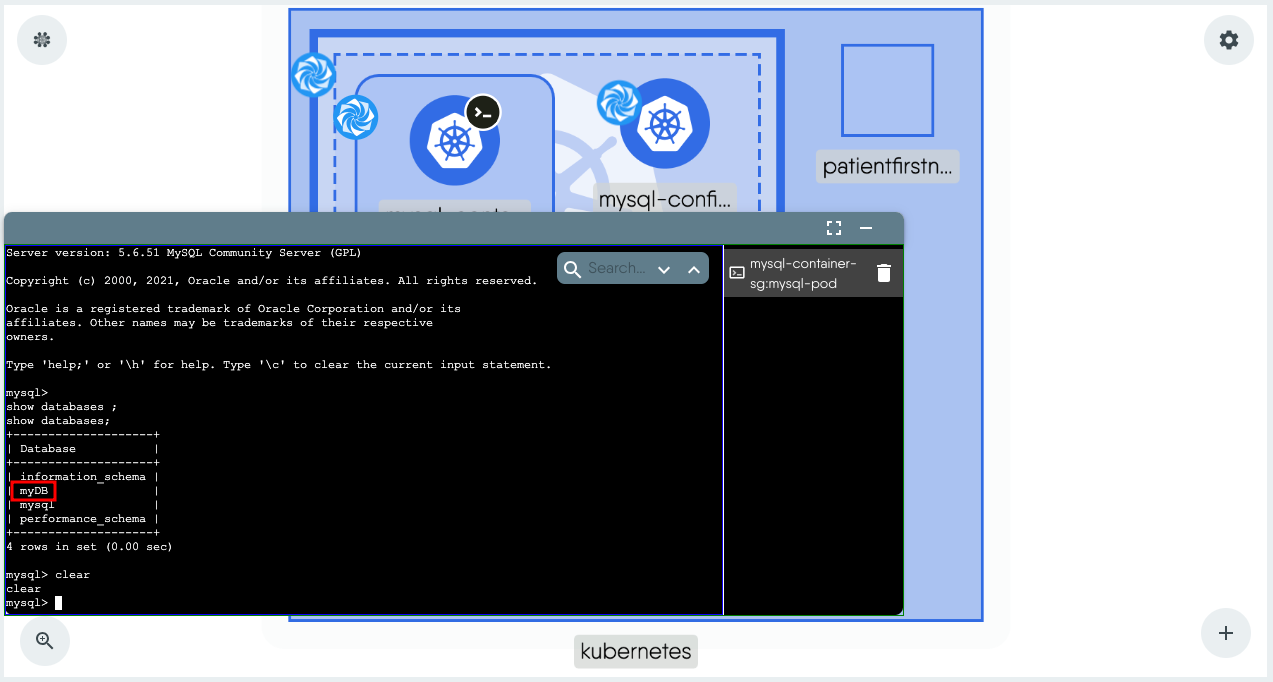
Run the following MySQL command to verify that the database set as a ConfigMap was indeed created.
show databases;
Deleting the resources
To delete the resources, use the Undeploy option from the Design view.
Conclusion
Congratulations! You’ve successfully completed a tutorial on Kubernetes ConfigMaps and Secrets using the Meshery Playground. This hands-on experience should have equipped you with practical knowledge on managing configuration data and sensitive information in Kubernetes. Continue exploring more such scenarios in the Meshery Playground to enhance your skills.