Kubernetes Request Flow – A Visual Guide
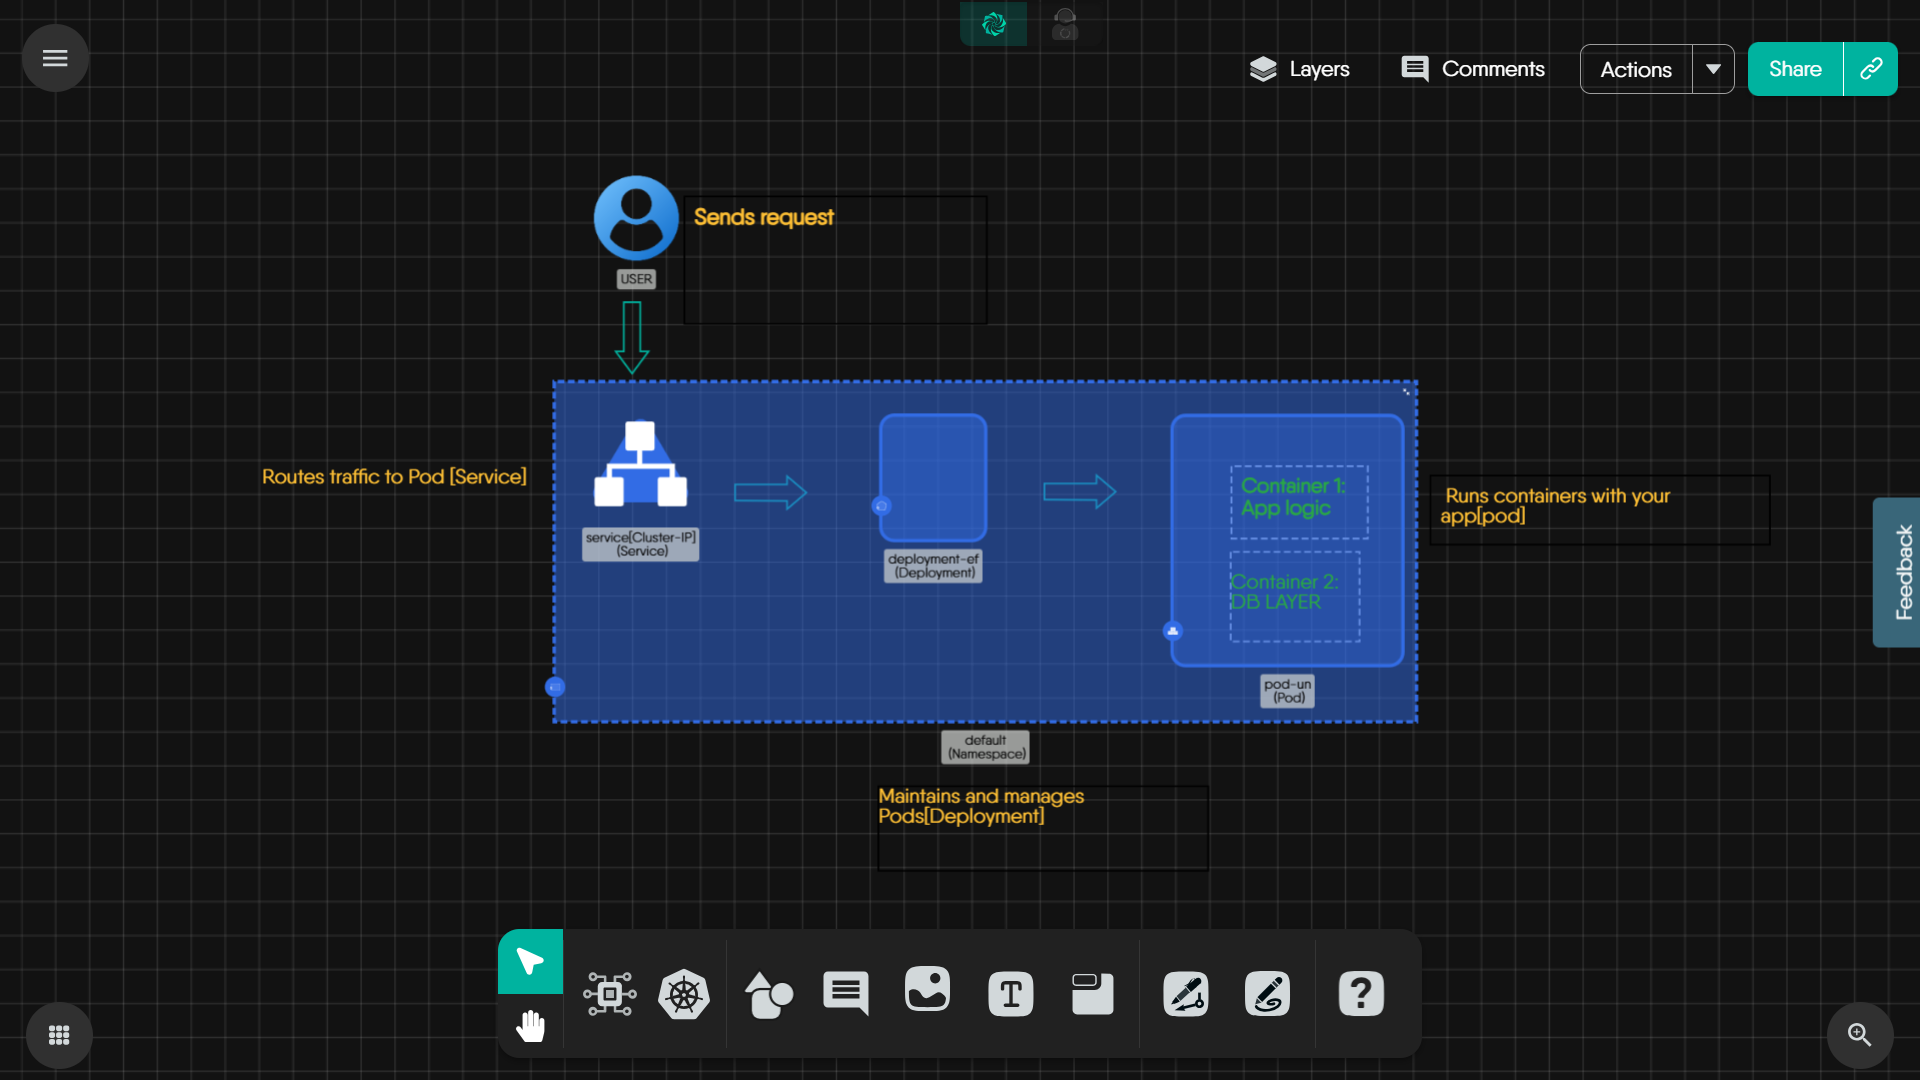
In this tutorial, we will explore the exact journey a request takes inside a Kubernetes cluster from the moment a user hits “Enter” in their browser, to the moment a response is sent back. We will understand the fundamental data path of a request - from the user to the container, using a diagram built in Meshery Kanvas.
Note: This tutorial is completely visual and beginner-friendly. No YAML or CLI is required.
Prerequisites
- Basic understanding of Kubernetes objects (Service, Pod, Container)
- Access to the Meshery Playground. If you don’t have an account, sign up at Meshery Playground.
Lab Scenario
We will explore a simple application architecture in Kubernetes.
- A User sending a request
- A Service (ClusterIP) routing the request
- A Deployment managing a Pod
- The Pod running two containers: one for logic and one for database interactions
This is a common real-world pattern seen in microservices architectures and backend systems.
Objective
We will visually explore how all the kubernetes components come together using Meshery Kanvas, and learn how this understanding can simplify debugging and designing applications.
Walkthrough in Meshery Kanvas
Accessing the Visual Guide Design
Click the image above to open the interactive design in Meshery Kanvas.
- Once inside Kanvas, we will see a complete layout of how a request flows through the Kubernetes architecture. We are going to understand what’s happening in this architecture.
- If it looks a bit overwhelming at first, zoom in/out or drag around the canvas to get comfortable with the layout.
Understanding the Components
1. User
- This isn’t a Kubernetes object, but it’s been included to show where the request begins, like someone opening the app in a browser or making an API call.
2. Service (ClusterIP)
- This is the entry point into the cluster.
- It forwards traffic to the Pods. While this visual is a placeholder, in a real Kubernetes Service, we would typically define a type (like ClusterIP or NodePort) and use selectors to route traffic to matching Pods. This is how services know where to forward requests.
- A Kubernetes Service acts like a load balancer inside the cluster.
3. Deployment
- It handles the app’s lifecycle — scaling, rolling updates, and keeping replicas alive. It also ensures self-healing (restarts crashed Pods).
- The Deployment here is meant to represent how Kubernetes manages Pods and acts as a layer of abstraction so we don’t interact with Pods directly.
- Typically, we would see replica counts and labels defined. These labels are crucial because they are how the Deployment matches with Pods.
4. Pod
- Pods are where the app lives, the actual workloads.
- Each Pod has one or more containers. Even if we are running just one container, Kubernetes still wraps it in a Pod.
- In a real Pod spec, we would see metadata, container definitions, and possibly resource limits.
5. Containers (Inside the Pod)
- In this design, we have two containers inside the Pod like roommates sharing the same space and network.
- Container 1: Application Logic – the app’s backend or frontend code.
- Container 2: DB Layer – a simple service handling persistence, cache, or a local DB.
- This is super helpful if we are trying to understand how traffic flows into our app or how containers talk to each other inside the Pod.
- In a real design, containers show details like image names, ports, and environment variables. This layout is simplified, but helps visualize the app structure.
Why This Flow Matters
At first glance, Kubernetes might seem like a maze of abstract objects like Services, Deployments, Pods. But once we visualize how a simple request flows from a user all the way to the container, things start to click.
Understanding this path helps us:
-
Debug faster — “Why am I not getting a response?” becomes easier to track when we know who is responsible for routing and serving.
-
Scale smarter — Once we know where the load hits, we can add replicas where it actually matters.
-
Design better — From tracing logs to optimizing performance, knowing the flow helps us place the right tools in the right spots.
Think of this request path as the backbone of your Kubernetes understanding. Everything else like Ingress, HPA (Horizontal Pod Autoscalers), or Service Meshes builds upon this foundation.
Operate This Flow
-
If we want to go beyond just “viewing” the flow, we can switch to Meshery Kanvas → Operate Mode to interact with real Kubernetes clusters. This lets us:
- Swap containers inside Pods
- Change replica counts for Deployments
- Observe how traffic would flow with different setups
All of this happens visually, without having to write or apply any YAML.
Want to Try Building It Yourself?
If we want to recreate this flow from scratch, we can drag and drop the same components inside Meshery Kanvas → Design Mode. It’s a great way to test our understanding and see how things fit together.
Diagram Screenshot
Note: You can design this yourself using the components in Meshery Kanvas.
Conclusion
Congratulations! You have now visually walked through one of the most fundamental flows in Kubernetes: how a request reaches your app and how each component plays its part. This foundation is key for deeper learning from Ingress Controllers to autoscalers and service meshes. Keep exploring, keep designing in the Meshery Playground to enhance your skills.
