Contributing to Meshery Docs
Before contributing, please review the Documentation Contribution Flow.
Use the following steps to set up your development environment depending on your Operating System of choice, fork the repository, install dependencies and run the site locally. You can then make changes, test locally, sign-off and commit, and push the changes made for review.
See the Meshery Documentation Design Specification which serves to provide an overview of the tooling and approach used to create Meshery’s documentation and its information architecture.
Documentation Framework
Meshery documentation is built using the following components:
- Framework - Hugo (Extended)
- Theme - Docsy (imported as a Hugo module)
- Repo - https://github.com/meshery/meshery/tree/master/docs
- Site - https://docs.meshery.io
Set up your development environment
The Meshery Docs site is built using Hugo - a fast static site generator. Hugo is installed automatically as an npm dependency, so you only need Node.js and Go installed on your system.
Prerequisites
The following tools are required to build and run the Meshery documentation site locally:
In case of any installation issues, use the discussion forum.
Get the code
Fork and then clone the Meshery repository
git clone https://github.com/YOUR-USERNAME/mesheryChange to the docs directory
cd docsInstall dependencies
make setupThis runs
npm install, which installs Hugo Extended and all other required dependencies.
Serve the site
Serve the site locally.
make siteThis runs
hugo server -D -F, which serves the site with draft and future content enabled. The site will be available athttp://localhost:1313.To build the site without serving:
make build
Using Docker
If you have Docker and make installed on your system, then you can serve the site locally. This doesn’t require the need to install Hugo, Node.js, or Go on your system.
This may not work in Windows.
Run the following command from the docs folder.
make docker
This runs docker compose watch, which builds and serves the site inside a container.
Using Gitpod
- Ensure you have an account on Gitpod and add the Gitpod extension to your browser.
- Open your forked Meshery repository on GitHub.
- Click on the “Gitpod” button in the top right corner of the repository page (it is only visible with the Gitpod browser extension installed).
Gitpod will automatically clone and open the repository for you in a browser-based version of Visual Studio Code. It will also automatically build the project for you on launch, comes with Docker and other tools pre-installed, making it one of the fastest ways to spin up a development environment for Meshery.
After opening the project on Gitpod, change to the docs directory.
cd docsInstall dependencies and serve the site.
make setup
make site
You should be able to access the site on port 1313. If you want to access it in your localhost read the docs for port-forwarding using ssh.
Using GitHub Codespaces
- Ensure you have an account on GitHub
- Open your forked Meshery repository on GitHub.
- Click on the “Code” button of your forked repository it will give you the option to open the project in GitHub Codespaces.
GitHub Codespaces will automatically clone and open the repository for you in a browser-based version of Visual Studio Code. It comes with pre-installed tools which are quite helpful to spin up the development environment for Meshery.
After opening the project on GitHub Codespaces, change to the docs directory.
cd docsInstall dependencies and serve the site.
make setup
make site
You should be able to access the site on port 1313. If you want to access it in your localhost just click the code button on your forked repository and select open with Visual Studio Code under your GitHub Codespace this will launch a GitHub Codespace instance in your local machine and connects with the remote GitHub Codespace environment after that run cd docs then make setup && make site and it will start the development server on port 1313.
Make Necessary Changes
- Make changes as required based on the issue you are solving.
- Ensure to verify that your changes reflect correctly by serving the site locally using
make site.
If the issue requires making new doc page that replaces the old page, please don’t forget to add a redirect link on the old page. In Hugo, you can add an aliases field in the frontmatter of the new page to redirect from the old URL.
Create a Pull Request
After making changes, don’t forget to commit with the sign-off flag (-s)!
git commit -s -m "my commit message w/signoff"Once all changes have been committed, push the changes.
git push origin [branch-name]Then on GitHub, navigate to the Meshery repository and create a pull request from your recently pushed changes!
- See the Meshery Documentation Google Doc for additional reference.
Using the features of Meshery Docs
Linking to Pages and Assets
Internal content pages use Hugo’s ref shortcode:
[About]({{< ref "about.md" >}})
Page-bundle assets use standard relative paths. For assets adjacent to index.md or _index.md, or inside that page bundle:
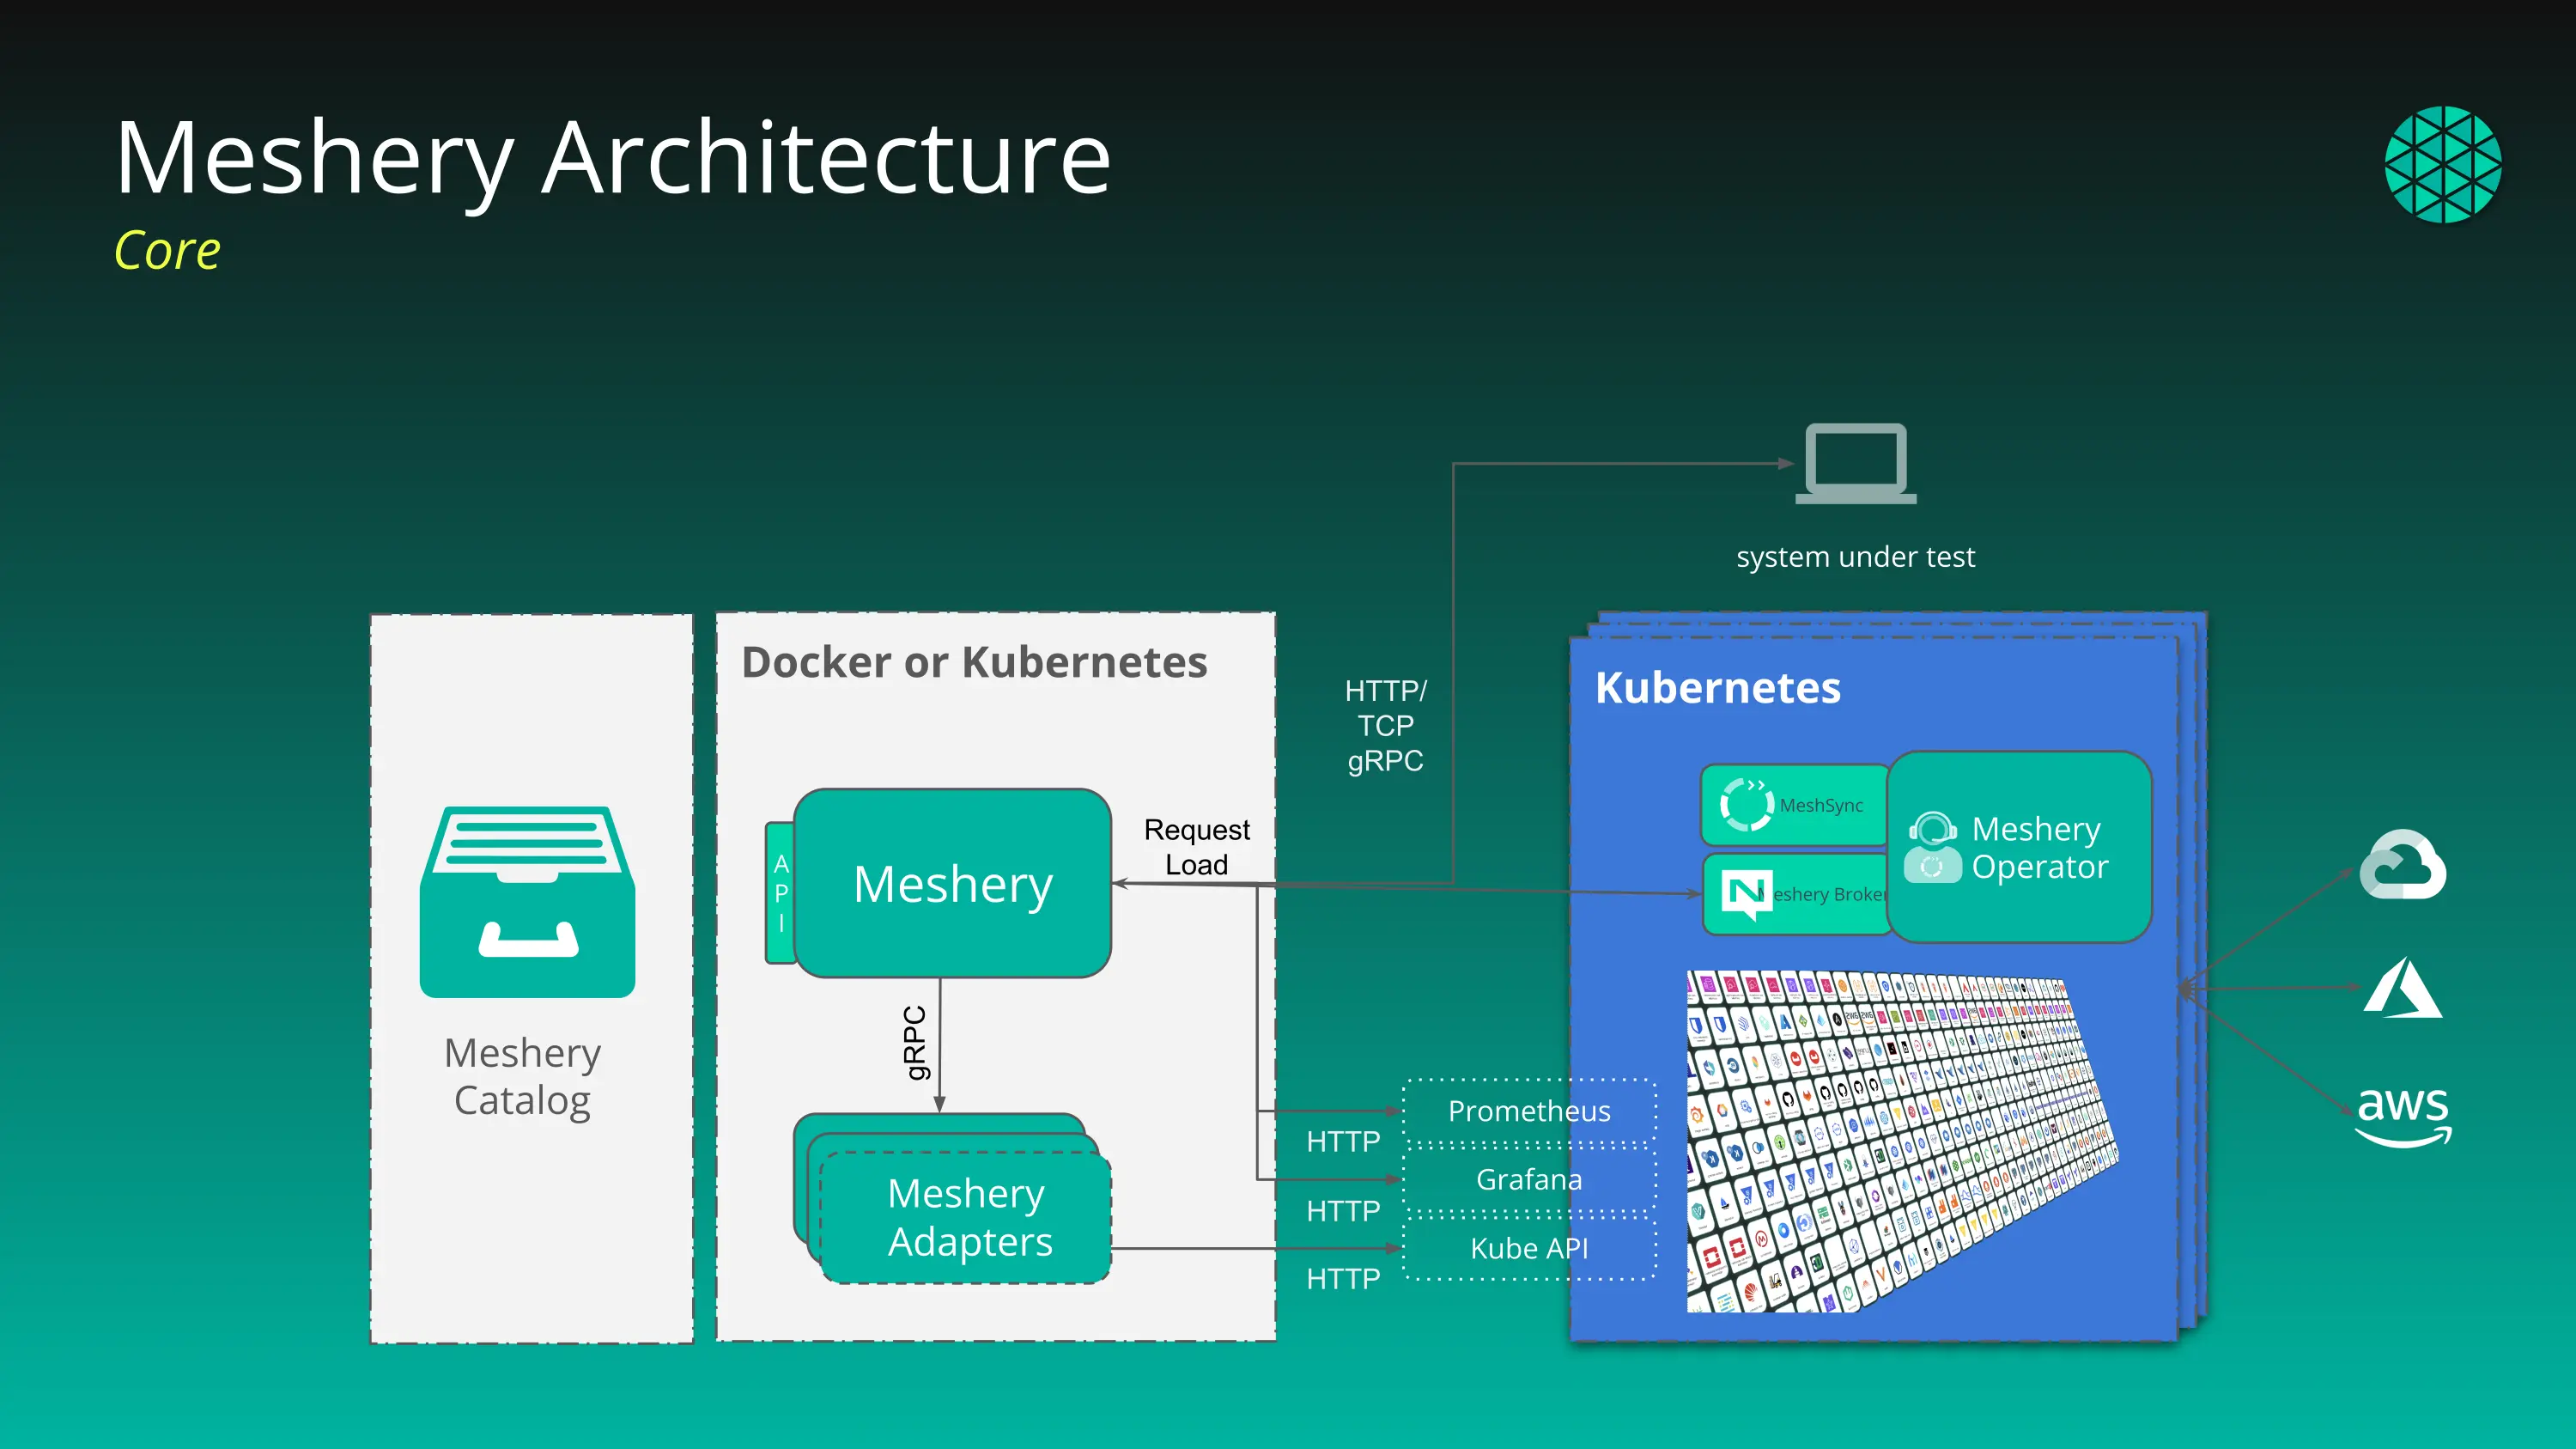
<img src="/images/meshery-architecture.webp" />
Global shared assets under static/ use the static shortcode:
{{< static "images/logo.png" >}}
Do not use raw root-relative page links like [About](/about/). External links (starting with http://, https://, mailto:, tel:, #) should be kept unchanged.
Clipboard Feature
Most popular clipboard plugins like Clipboard JS require the manual creation of a new ID for each code snippet. A different approach is used here. For code snippets, we either use html tags or markdown in the following manner:
<pre class="codeblock-pre"><div class="codeblock">
<code class="clipboardjs">code_snippet_here</code>
</div></pre>
You can also use the code shortcode created for this feature to make it easy to use. It can be used by passing the code snippet to it.
If the code snippet does not contain any special characters then, it can be used directly as below:
{{< code code="code_snippet_here" >}}
If the code snippet has special characters then use backtick delimiters:
{{< code code=`code_snippet_here` >}}
Don’t use code shortcode when the snippet is in between an ordered list, this breaks the order and next item in the list will start numbering from 1. Instead, use <pre class="codeblock-pre">...</pre> method described above.
A full block:
```code snippet```
Inline formatting:
`code snippet`: `code snippet`
Language specific:
		(language name)
code snippet
Whenever the code tags are detected, the clipboard javascript file is automatically loaded. Each code element is given a custom id and a clipboard-copy icon to copy the content.
Documentation Contribution Flow Summary
For contributing mesheryctl reference section, refer Contributing CLI
The following is a concise summary of the steps to contribute to Meshery documentation.
- Create a fork, if you have not already, by following the steps described here
- In the local copy of your fork, navigate to the docs folder.
cd docs - Create and checkout a new branch to make changes within
git checkout -b <my-changes> - Edit/add documentation.
vi <specific page>.md - Add redirect link on the old page (only when a new page is created that replaces the old page). In Hugo, use the
aliasesfrontmatter field. - Run site locally to preview changes.
make site - Commit, sign-off, and push changes to your remote branch.
git push origin <my-changes> - Open a pull request (in your web browser) against the repo: https://github.com/meshery/meshery.
Navigation Table of Contents in Sidebar (toc)
Sidebars use a data file at data/toc.yml to create a table of contents. It is written in the following manner:
- title: Group 1
  url: group1
  links:
    - title: Thing 1
      url: group1/thing1
    - title: Thing 2
      url: group1/thing2
    - title: Thing 3
      url: group1/thing3
The output of the code snippet would be:
    Group 1
      Thing 1
      Thing 2
      Thing 3
In this example, Group 1 is a parent section within the Table of Contents, and Thing 1, Thing 2, and Thing 3 are children of Group 1. This is a direct hierarchy with a single level of children under the parent.
Grandchildren are added in the sidebars in the following manner:
- title: Group 1
  url: group1
  links:
    - title: Thing 1
      url: group1/thing1
      children:
        - title: Subthing 1.1
          url: group1/thing1/subthing1_1
        - title: Subthing 1.2
          url: group1/thing1/subthing1_2
    - title: Thing 2
      url: group1/thing2
    - title: Thing 3
      url: group1/thing3
The output of the code snippet would be:
    Group 1
      Thing 1
       Subthing 1.1
       Subthing 1.2
      Thing 2
      Thing 3
Here, Subthing 1.1 and Subthing 1.2 are the grandchildren of Thing 1.
The sidebar template in layouts/partials/sidebar.html reads from data/toc.yml and supports up to four levels of navigation hierarchy.
- Parent: It serves as a top level category for related content.
- Children (
links): They are immediate subsections or topics that fall under the parent section. - Grandchildren (
children): They are nested under a link and provide a more detailed breakdown of information within the child section. Grandchildren are used to organize content further, offering a more detailed structure for a specific topic. - Great-grandchildren (
grandchildren): An additional level of nesting for even finer-grained organization.
These sections create a hierarchical and organized navigation experience for readers.
Alerts
An alert is a box that can stand out to indicate important information. You can choose from levels success, warning, danger, info, and primary. This example is an info box, and the code for another might look like this:
		{{% alert color="info" title="Here is another!" %}}
{{% /alert %}}
Just for fun, here are all the types:
This is a warning
This alerts danger!
This alerts success
This is useful information.
This is a primary alert
This is a secondary alert
This is a light alert
This is a dark alert
alert shortcode
Meshery Docs uses the alert shortcode (provided by the Docsy theme) to provide consistent formatting for notes, warnings, and various informative callouts intended for the readers.
To use the alert shortcode feature in our documentation include the following code:
		{{% alert color="info" title="Here is another!" %}}
{{% /alert %}}
Other supported alert colors include warning, danger,success,primary, secondary, light, dark .
Image Handling
Control image display in documentation pages using the following methods.
Default Image Size in Markdown Format
Using the Markdown image syntax:
[](../../../assets/img/your-image.png)
This renders as:
		<a href=\"/assets/img/your-image.png\">
    <img src=\"/assets/img/your-image.png\" alt=\"Image Title\">
</a>
Effect:
- Image is displayed at its original resolution, limited by global CSS (
max-width: 90vw; max-height: 90vh; height: auto; width: auto;) - On larger screens (
min-width: 1200px), image width can be up to1200px - Clickable, opening in Lightbox if the format is supported
Custom Image Size (for Control)
If you need to specify dimensions, use:
		<a href=\"/assets/img/your-image.png\">
    <img src=\"/assets/img/your-image.png\" style=\"width:500px; height:auto;\" alt=\"Image Title\">
</a>
Effect:
- Image width is fixed at
500px, maintaining aspect ratio - If
500pxexceeds90vw, it will be constrained to90vw - Clickable, opening in Lightbox for full-size viewing
Quotes
You can include block quotes to emphasize text.
Here is an example. Isn’t this much more prominent to the user?
Development
Adding Integration Specific Information to Individual Integration Pages
Integration pages (example) are automatically generated, however, integration specific documentation is often needed.
modelscustominfo collection holds custom markdown files. Follow these steps:
- Create a file inside the
modelscustominfocollection. - Ensure the file includes frontmatter with the
titlekey, set to the title of the integration.
The content that follows the frontmatter in this file will be automatically parsed and rendered on the integration page
Example:
file: modelscustominfo/aad.md
---
title: Azure Active Directory (AAD)
---
<h2>Azure Active Directory (AAD)</h2>
In this example, the heading “Azure Active Directory” will be displayed on the integration page: Azure Active Directory Integration Page
Suggested Reading
Disable suggested reading by setting the suggested-reading frontmatter variable to false.
Editable Intra-page Table of Contents Toolbar
Control the display of this intra-page navigator with either page level or layout level frontmatter variables:
display-toolbar
Set to true (make “editable” toolbar visible) or false (hide “editable” toolbar)
if conditional
In Hugo templates, conditionals are written using Go template syntax:
		{{ if eq .Params.title "Awesome Shoes" }}
  These shoes are awesome!
{{ end }}
If the condition is true, the output would be:
These shoes are awesome!
range loop
The range action iterates over a collection. It is written in the following manner:
		{{ range .Pages }}
  {{ .Title }}
{{ end }}
The output produced by the above code snippet would list the titles of all pages in the current section.
Comment
In Hugo templates, comments are written using Go template comment syntax:
{{/* This is a comment */}}
Any content inside {{/* */}} will not be rendered in the output.
Partial
Partials are used to include reusable template fragments. They are written in the following manner:
{{ partial "header.html" . }}
Shortcode
Shortcodes are reusable content snippets that can be used in Markdown files. They are written in the following manner:
{{</* shortcode-name param="value" */>}}
Variable
In Hugo templates, variables are defined using the := operator:
{{ $variable1 := true }}
Two helpful resources:
- Hugo Docs - https://gohugo.io/documentation/
- Go Template Docs - https://pkg.go.dev/text/template