Contributing to Meshery UI - Notification Center
Prerequisite Reading
Table of Contents
- What is the Notification Center?
- Metadata Formatter
- How Notification Metadata is Rendered
- Types of Event Specific Notification Formatters
What is the Notification Center?
The Notification Center is a dedicated panel in Meshery’s UI that helps you monitor, understand, and respond to events across your system. It acts as a central place where you can see important updates related to your infrastructure, workloads, and Meshery’s internal operations.
Want to understand how users interact with the Notification Center? Learn more here.
The NotificationCenter component of Meshery UI Switching to Graphql subscriptions and implementing robust filtering. Events are persisted in Meshery Server and state management on client is done using Redux Toolkit and RTK.
User-facing Features
- Robust filtering support inspired by GitHub’s notification filtering style.
- Search is also included.
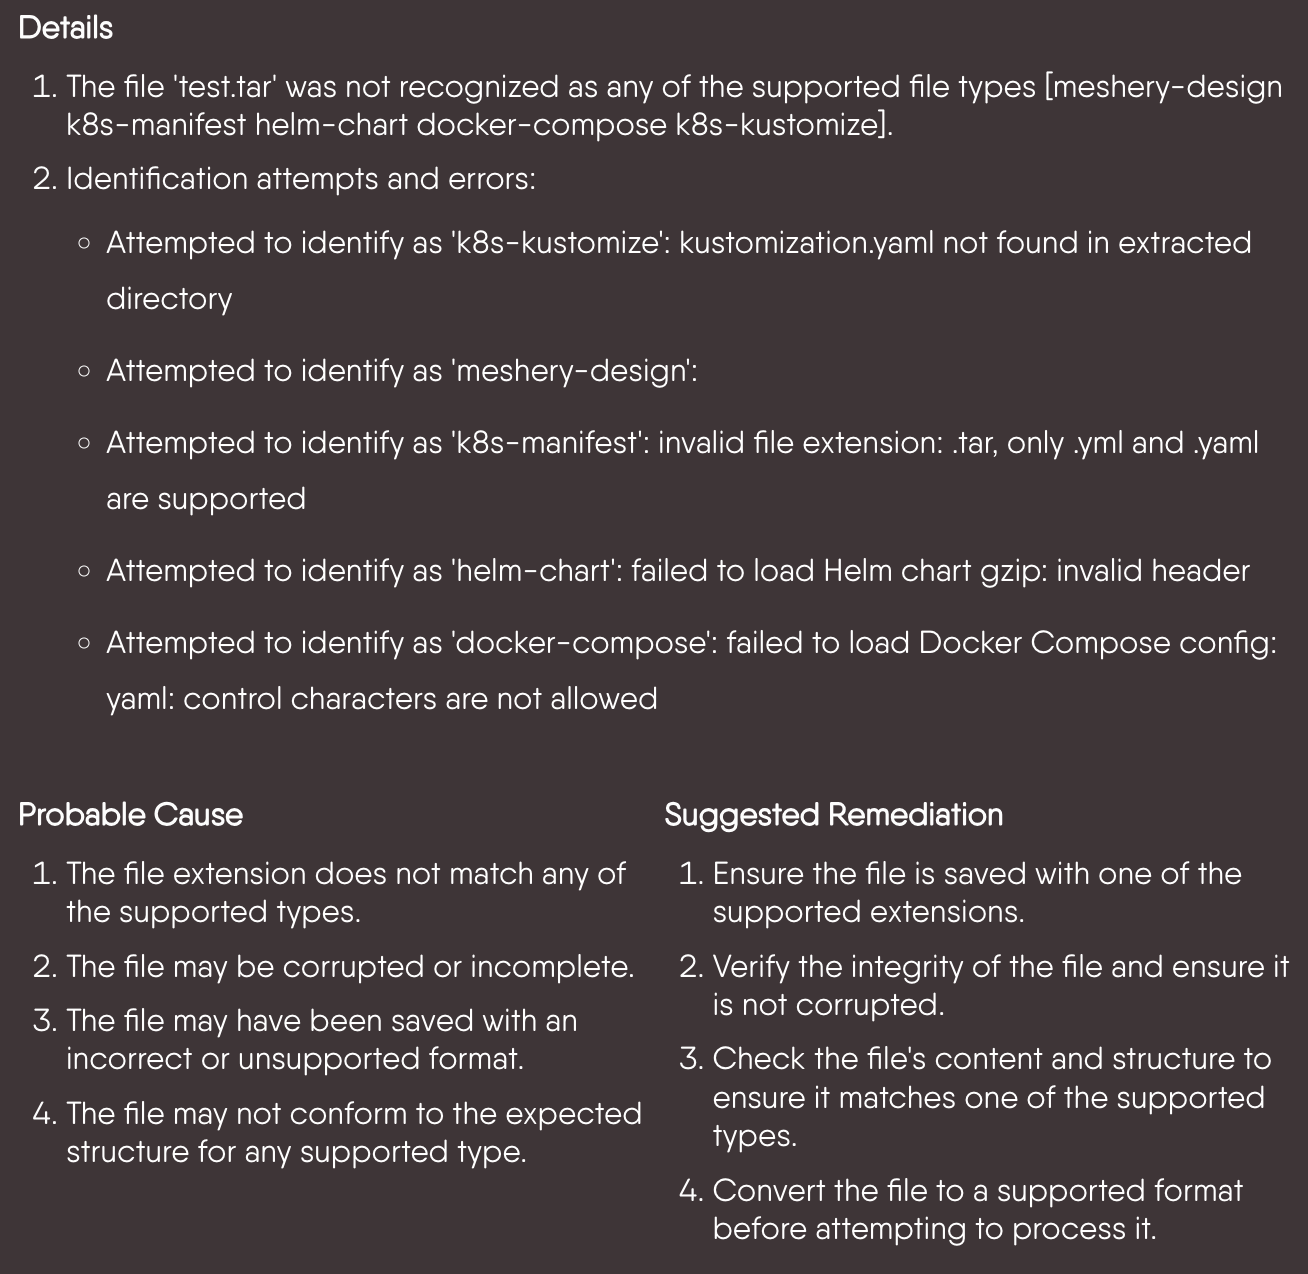
- Proper hierarchial presentation of error details, including probable cause and suggested remeditation.
- Support for notification status (notifications can be marked as read and unread)
- Future: Notifications can be acknowledged or resolved.
- Event-based notification via Graphql subscription (provided by Meshery Server and any upstream components or externally managed systems, like Kubernetes)
- Infinite scroll for pagination.
State Management and Internal Details
- The State on client is managed using
Redux TooltikandRtk-query - Update and Delete operations are optimistically handled.
- Network Request are cached and are invalidated when new events come or events are deleted/updated.
- Due to need for infinite scroll and optimistic update the events are stored globally in Redux.
Bulk Operations
Bulk operations in the Notification Center allow users to perform actions like deleting multiple notifications or changing the status of multiple notifications in a batch. This documentation outlines the key features and functionality of bulk operations, including the restriction of performing only one bulk operation at a time, the disabling of buttons during ongoing operations, and the display of a loading icon to indicate ongoing activity.
Initiating a Bulk Operation
- Users select the notifications they want to include in the bulk operation. This is typically done by checking checkboxes next to each notification.
- After selecting notifications, users trigger the desired bulk operation (e.g., delete or change status) by clicking the corresponding action button.
- Once initiated, the bulk operation begins processing the selected notifications.
Metadata Formatter
When the server sends an event, it follows a consistent schema that contains metadata intended for user presentation. This metadata typically includes fields such as description, date, user_id, system_id, action, and the resources involved.
In some cases, the metadata may also contain more detailed information—such as a traceback, a summary, or a complete error log—which is dynamically generated at runtime and encapsulated within the event.
Presenting this structured information in a clear and accessible way is essential, as it provides valuable insights into system behavior and ongoing operations.
To accomplish this task, we employ metadata formatters that transform structured data into visually appealing formats. There are currently two types of formatters in use:
- Metadata Specific Formatters: These formatters are specifically designed for particular types of metadata, such as Error and DryRunResponse. Metadata Specific Formatters are implemented as React components that take the metadata as input and render it within the component.
- Dynamic Formatter: Since metadata can vary significantly in structure, it is not practical to create a specific formatter for each kind. Dynamic formatters analyze the schema’s structure and apply custom-defined rules for formatting:
- Text strings are rendered using the BodySectionRenderer (more on this later).
- Arrays are rendered using the ArrayRenderer.
- Key-value pairs are rendered using the KeyValueRenderer.
- Nested objects are recursively rendered.
BodySectionRenderer
The BodySectionRenderer is responsible for formatting and rendering raw text strings into React components. During this process, it parses the string to replace external links with <Link> components and checks if the link matches predefined sites to render the link accordingly.
ArrayRenderer
The ArrayRenderer is responsible for rendering an array of items in a recursive manner, presenting them as a bulletized list using the MetdataFormatter.
KeyValueRenderer
Object properties with string values are considered key-value pairs and are rendered as such.
The Metadata Specific Formatter
Certain metadata, such as Kubernetes responses and Errors, hold high importance and have dedicated renderers. These dedicated renderers can still utilize the dynamic formatter to format specific parts of the response, such as DryRunResponse.
Reusability
While this system was initially developed for our events and notification center, the components it comprises are highly reusable and can be employed in other contexts where dynamic formatting of structured data is required.
How Notification Metadata is Rendered
When a notification event is received from the server, it includes a metadata field containing structured, event-specific information. The purpose of formatters is to present this data in a clean, readable, and user-friendly format inside the expanded view of each notification.
The core logic for rendering metadata is handled by the FormattedMetadata component in metadata.js, which follows this decision tree:
-
Event-Specific Formatter Check
If a formatter exists for the event’s type (registered underEventTypeFormatters), that dedicated formatter is used to fully control how the metadata is displayed. -
Fallback to Property-Based Formatting
If no event-specific formatter is found, theFormattedMetadatacomponent falls back to theFormatStructuredDatafunction (also inmetadata.js).- This function renders each key-value pair from the
metadatausing the mappings defined in:PropertyFormatters– for structured or specialized visual formats.PropertyLinkFormatters– for rendering clickable links (e.g., file paths, URLs).
- This function renders each key-value pair from the
Key Files and Directories
This section outlines the essential files and folders that you’ll interact with when working on Notification Center metadata formatters.
NotificationCenter/ (Root Directory)
- index.js: Contains the main context provider (
NotificationCenterProvider), the drawer component (NotificationCenterDrawer), and orchestrates the overall structure. - metadata.js: Defines
PropertyFormatters,LinkFormatters,PropertyLinkFormatters, andEventTypeFormatters. Contains theFormattedMetadatacomponent which decides how to format the metadata based on event type or specific properties. - notification.js: Defines how an individual notification is rendered.
formatters/ (NotificationCenter/formatters)
This directory houses reusable formatter components dedicated to specific types of metadata or event types.
- common.js: Contains shared components like
TitleLink,DataToFileLink,EmptyState. - error.js: Defines
ErrorMetadataFormatterfor displaying structured error details. - model_registration.js: Contains formatters for model import/registration events (
ModelImportMessages,ModelImportedSection). - pattern_dryrun.js: Defines
DryRunResponseFormatterwhich utilizes components fromDesignLifeCycle. - relationship_evaluation.js: Defines
RelationshipEvaluationEventFormatterresponsible for rendering notifications related to the evaluation of relationships between components in a design.
Types of Event Specific Notification Formatters
Common Formatter
The following reusable components standardize how notification links, empty states, and downloadable traces are displayed:
-
TitleLink: Renders a styled title with an external link icon.
Props:href(required): URL of the link.children: The link text.
-
EmptyState: Displays a description when no specific data is available for an event.
Props:event.description(optional): Text description of the event.
-
DataToFileLink: Converts event data into a downloadable
.txtfile.
Props:data(required): Can be a string or JSON object.
Error Formatter
The ErrorMetadataFormatter is used for formatting error-related notifications in the Meshery UI Notification Center. It structures error details, probable causes, and suggested remediations in a readable format.
- Details: A comprehensive explanation of the error, often broken into multiple points or steps.
- Probable Cause: A list of potential reasons why the error occurred, helping the user understand the root cause.
- Suggested Remediation: Actionable steps or recommendations to resolve the issue.
- Inside the ellipse menu, the user can find the error code docs link for further explanation of the error.
Props:
metadata(object): Contains error metadata fields such as:LongDescription: Provides details about the error.ProbableCause: Lists possible reasons for the error.SuggestedRemediation: Suggests solutions to fix the error.
event(object, optional): Contains the notification event data.
Path: ui/components/NotificationCenter/formatters/error.js
Example:
<ErrorMetadataFormatter
  metadata={
    LongDescription: "An unexpected error occurred while deploying the mesh.",
    ProbableCause: "Misconfigured Kubernetes cluster.",
    SuggestedRemediation: "Check your kubeconfig file and retry deployment.",
  }
  event={ description: "Mesh deployment failed" }
/>
When to Use:
The ErrorMetadataFormatter is used when dealing with structured error events that follow a pattern (description, cause, remediation). A new formatter should be created only if the error metadata deviates significantly from the ErrorMetadataFormatter metadata structure.
Model Registration Formatter
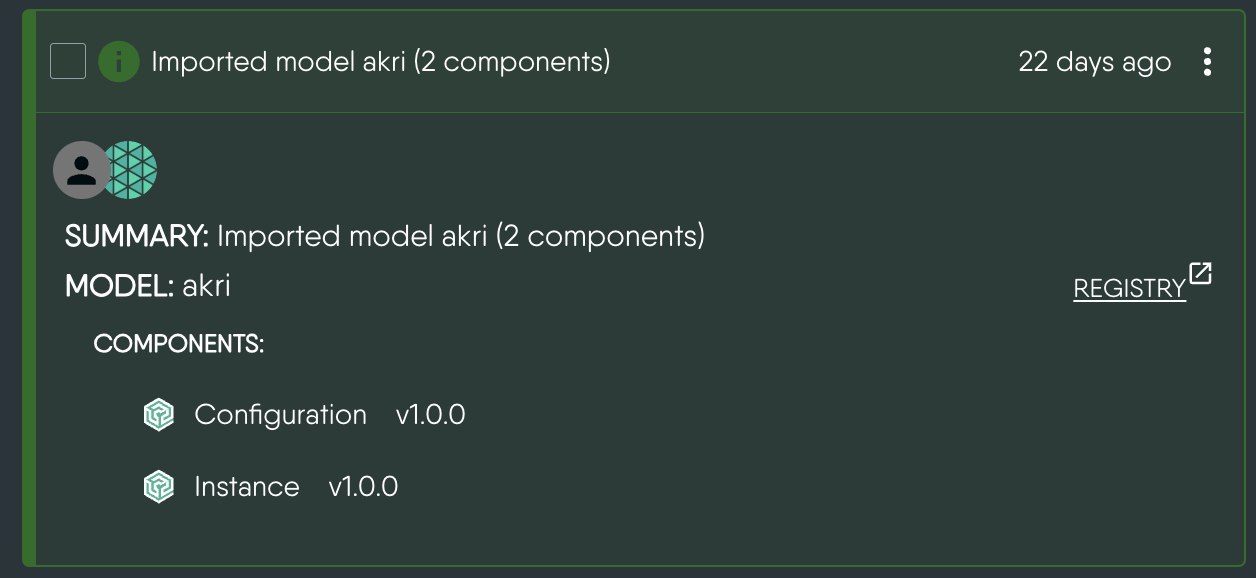
The Model Registration Formatter formats and displays model registration details, including components and relationships, in Meshery UI’s Notification Center. It ensures structured representation of imported models and error handling during the import process.
Path: ui/components/NotificationCenter/formatters/model_registration.js
Components:
-
UnsuccessfulEntityWithError: This component is used to handle error cases during model import. It identifies the type and count of entities that failed to import.
Props:
modelName(string): The name of the model being imported.error(object): Contains details about the error encountered during import.
-
ModelImportedSection: Displays the details of the imported model along with components, relationships, and any errors that occur.
Props:
modelDetails(object) – Contains model import data.
Relationship Evaluation Formatter
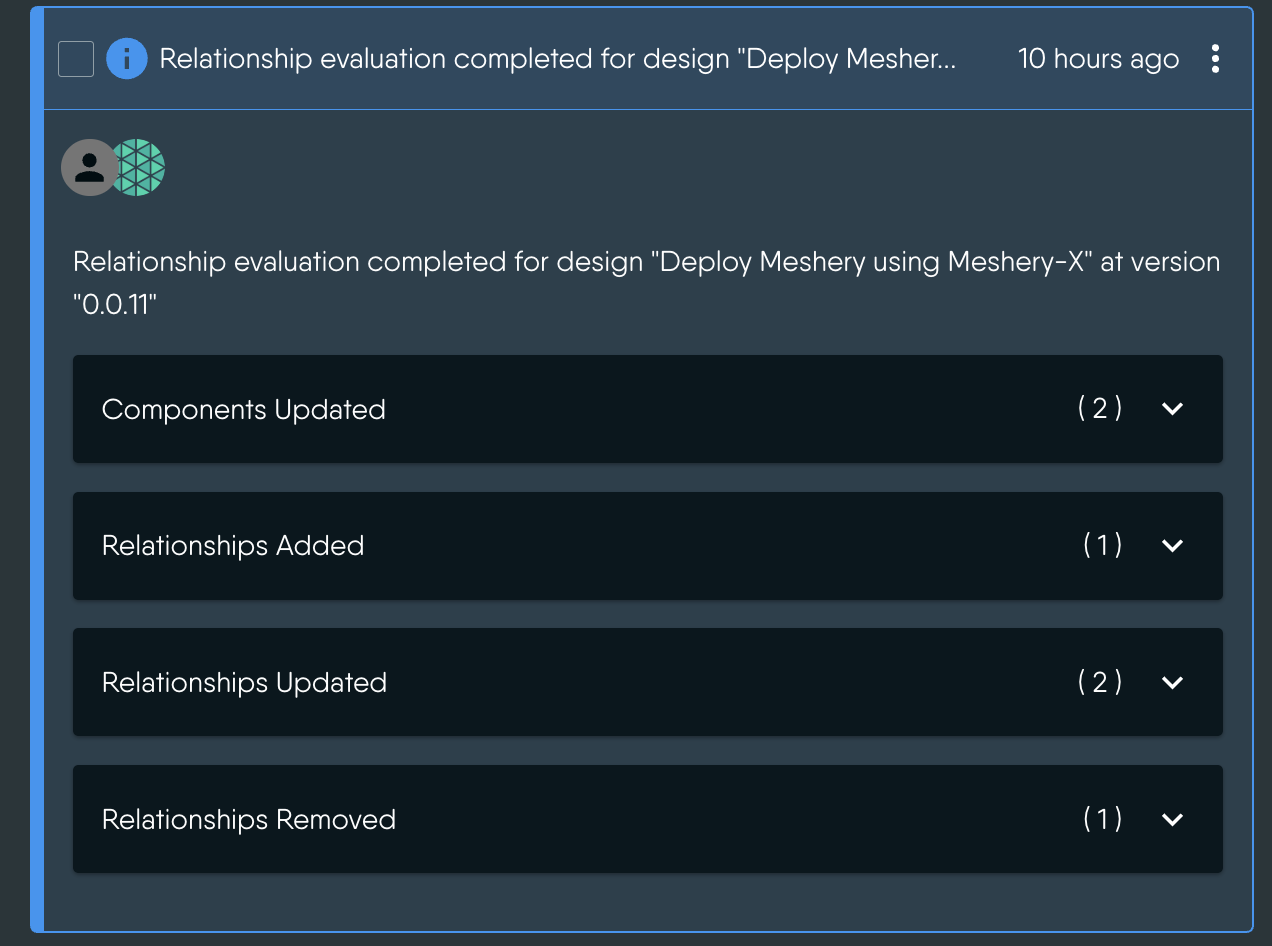
The Relationship Evaluation Formatter is responsible for rendering notifications related to the evaluation of relationships between components in a design. It provides a detailed breakdown of changes in components and relationships, such as additions, updates, and removals, during the evaluation process.
Path: ui/components/NotificationCenter/formatters/relationship_evaluation.js
Key Components
- RelationshipEvaluationEventFormatter:
The main formatter component that renders the event description and invokes theRelationshipEvaluationTraceFormatterto display detailed traces.
Props:
event(object): Contains:- description: A description of the evaluation process.
- metadata.trace: Contains categorized changes in components and relationships:
componentsAdded(Array)componentsUpdated(Array)componentsRemoved(Array)relationshipsAdded(Array)relationshipsUpdated(Array)relationshipsRemoved(Array)
When to Use
The Relationship Evaluation Formatter is specifically designed to handle notifications related to changes in components and their relationships during an evaluation process. Use this formatter in the following scenarios:
- When a notification involves the evaluation of relationships between components in a design.
- When you need to display categorized changes in components and relationships.
- When the event metadata includes a
traceobject containing detailed information about the changes in components and relationships.
User Experience: Relationship Evaluation Notification
-
Evaluation Summary:
The notification starts with a summary of the evaluation process.
Example:
"Relationship evaluation completed for design 'Deploy Meshery using Meshery-X' at version '0.0.11'"
This gives the user context about which design and version were evaluated. -
Detailed Changes:
The notification breaks down the changes into categories:- Components:
- Added: New components introduced in the design.
- Updated: Existing components that were modified.
- Removed: Components that were deleted from the design.
- Relationships:
- Added: New relationships established between components.
- Updated: Existing relationships that were modified.
- Removed: Relationships that were deleted.
- Components:
-
Component Details:
For each component, the notification displays:- Kind: The type of the component (e.g.,
Deployment,Service). - Name: The name of the component.
- Model and Version: The model and version associated with the component.
- Kind: The type of the component (e.g.,
-
Relationship Details:
For each relationship, the notification displays:- Type: The type of relationship.
- Source and Target: The components involved in the relationship (e.g.,
PodtoPod). - Model and Version: The model and version associated with the relationship.
Dry Run Formatter
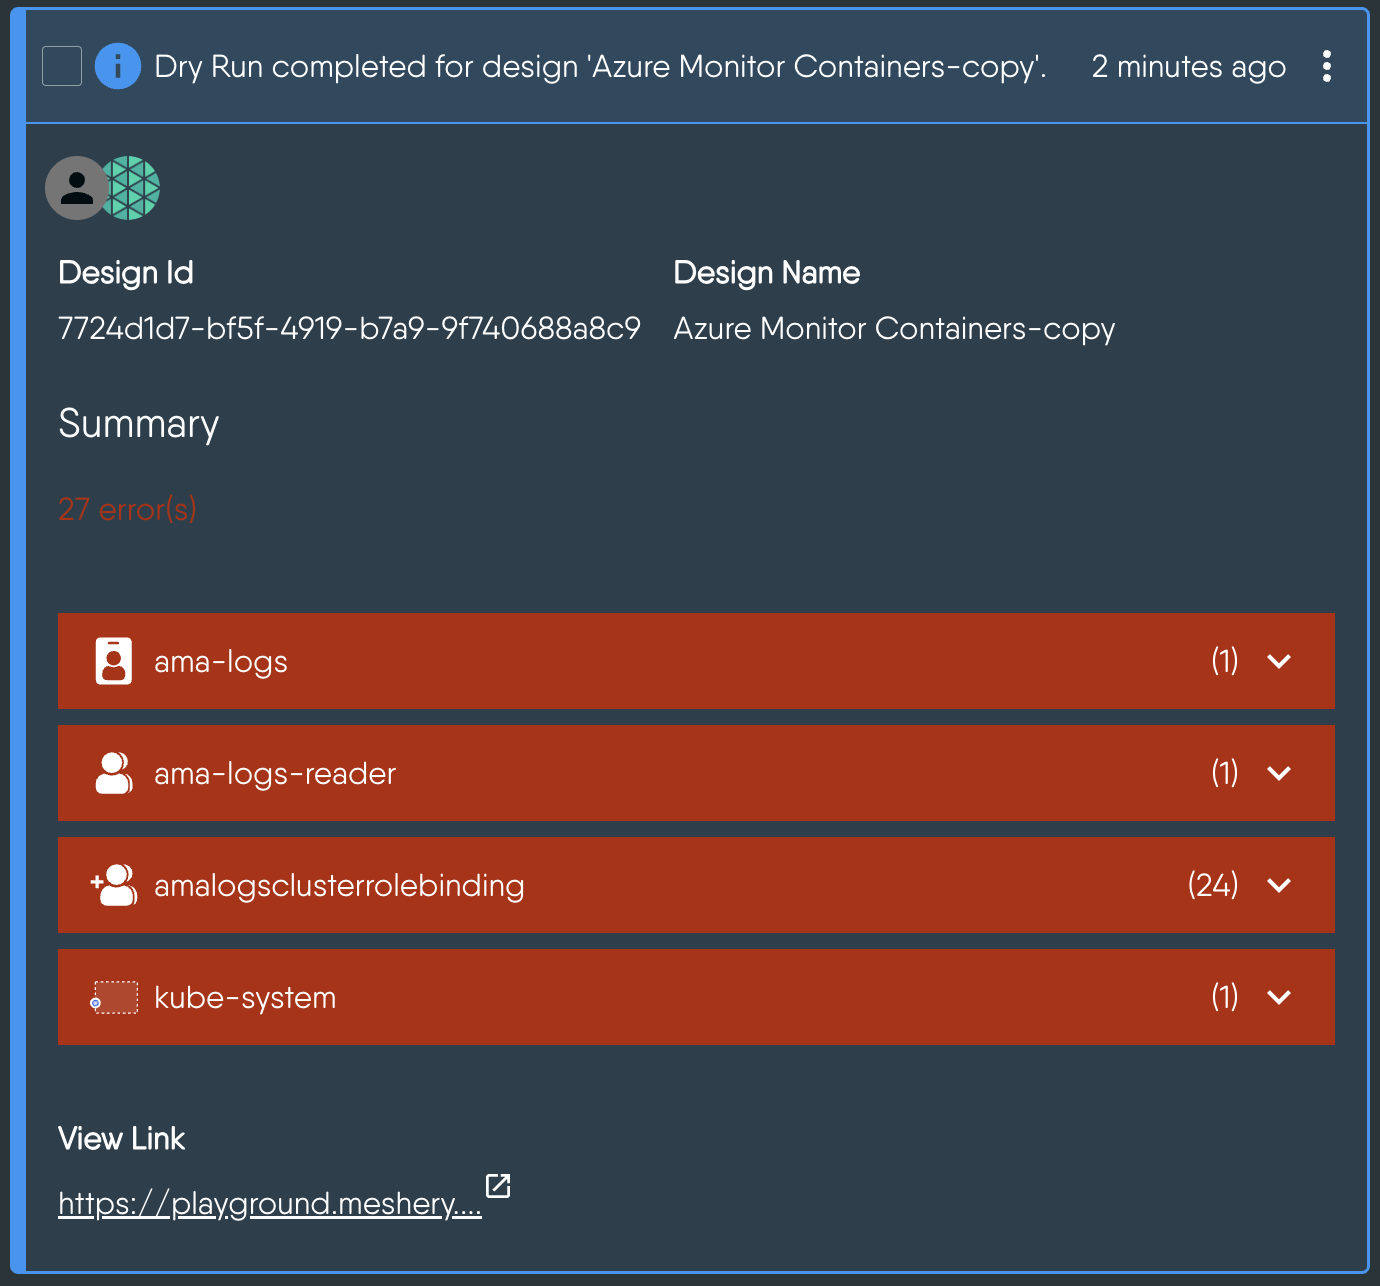
The Dry Run Formatter is responsible for rendering notifications related to the dry run validation of a design. A dry run simulates the deployment or undeployment of a design to identify potential errors without actually applying the changes.
Path: ui/components/DesignLifeCycle/DryRun.js
Key Components
- FormatDryRunResponse:
The main formatter component that renders the dry run validation results. It displays the total number of errors.
Props:
- dryRunErrors (array): An array of errors detected during the dry run. Each error includes:
type: The type of error (e.g.,RequestError,ComponentError).fieldPath: The specific field in the design where the error occurred.message: A detailed error message.
- configurableComponentsCount (number): The number of configurable components in the design.
- annotationComponentsCount (number): The number of annotation components in the design.
- validationMachine (object): The state machine handling the dry run validation process.
- currentComponentName (string): The name of the component currently being validated.
When to Use
The Dry Run Formatter is used in the following scenarios:
- When a notification involves the validation of a design through a dry run process.
- When you need to display errors detected during the dry run.
- When the event metadata includes details about configurable and annotation components.
Deployment Summary Formatter
The Deployment Summary Formatter is responsible for rendering notifications related to the deployment or undeployment of components in a design.
Path: ui/components/DesignLifeCycle/DeploymentSummary.js
Key Components
- DeploymentSummaryFormatter:
This component is used to display:- Event Description: A brief description of the deployment event.
- Errors: Any errors encountered during the deployment process.
- Component Details: A list of components with their deployment status and metadata.
Props:
- event (object): Contains:
- description: A brief description of the deployment event.
- action: The type of action performed (e.g.,
deploy,undeploy). - severity: The severity level of the event.
- metadata:
- summary: A detailed summary of the deployment process, including component details.
- error: Any errors encountered during the deployment process.
- design_name: The name of the design being deployed.
- design_id: The ID of the design being deployed.
When to Use
The Deployment Summary Formatter should be used in the following scenarios:
- Deployment or Undeployment Events:
When theevent.actionis eitherdeployorundeployand theevent.metadataincludesdesign_name. - When a notification involves the deployment or undeployment of a design.
PropertyFormatters and PropertyLinkFormatters
Purpose:
When an event does not match an event in EventTypeFormatters, PropertyFormatters and PropertyLinkFormatters are used to format and render specific metadata fields in a structured and visually appealing way.
Examples of Property Formatters
- trace: Converts large trace data into a downloadable file link.
- ShortDescription: Displays a short description of the event.
- Error: Uses the
ErrorMetadataFormatterto display structured error details.
When to Use
Use PropertyFormatters and PropertyLinkFormatters in the following scenarios:
- When an event does not have a specific
EventTypeFormatterdefined. - When you need to render individual metadata fields in a structured and visually appealing way.
- When metadata includes fields like trace data, short descriptions, or error details that require specialized formatting.


